AWS SES Setup
🧱 Service Inputs
📧 SES From Address (Template)
Create the following email alias in Hostinger before continuing with AWS SES setup.
Alias:
dev.noreplyHostinger Email Domain:
shelvera.com📌 Purpose:
- Used as the From identity in AWS SES
- Environment-safe (no prod prefix)
- Prevents accidental cross-environment email usage
AWS SES Configuration Steps
1. Open the AWS Access Portal and Start SES Setup
1.1 Open the AWS Access Portal
Open the AWS Access Portal:
1.2 Sign in with IAM Identity Center User
Login using the following IAM Identity Center username:
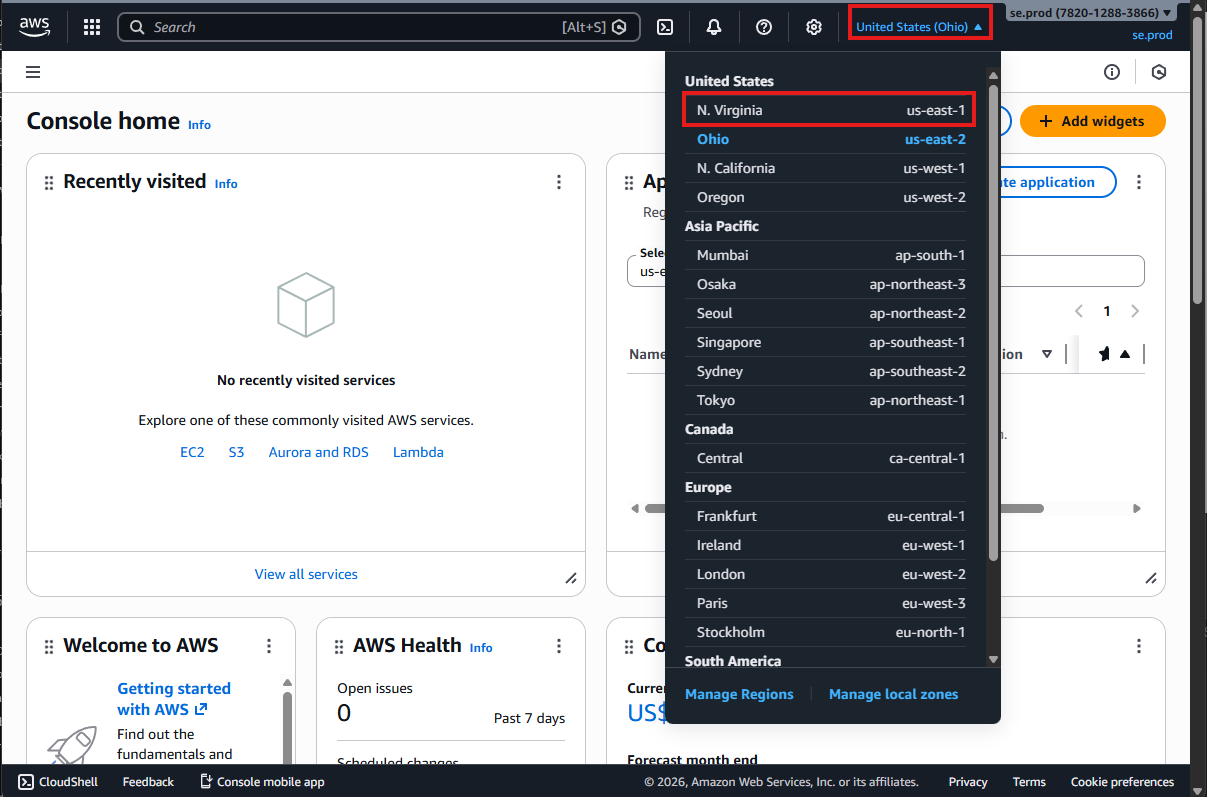
se.dev.iam01Select the region N. Virginia (if not selected already).
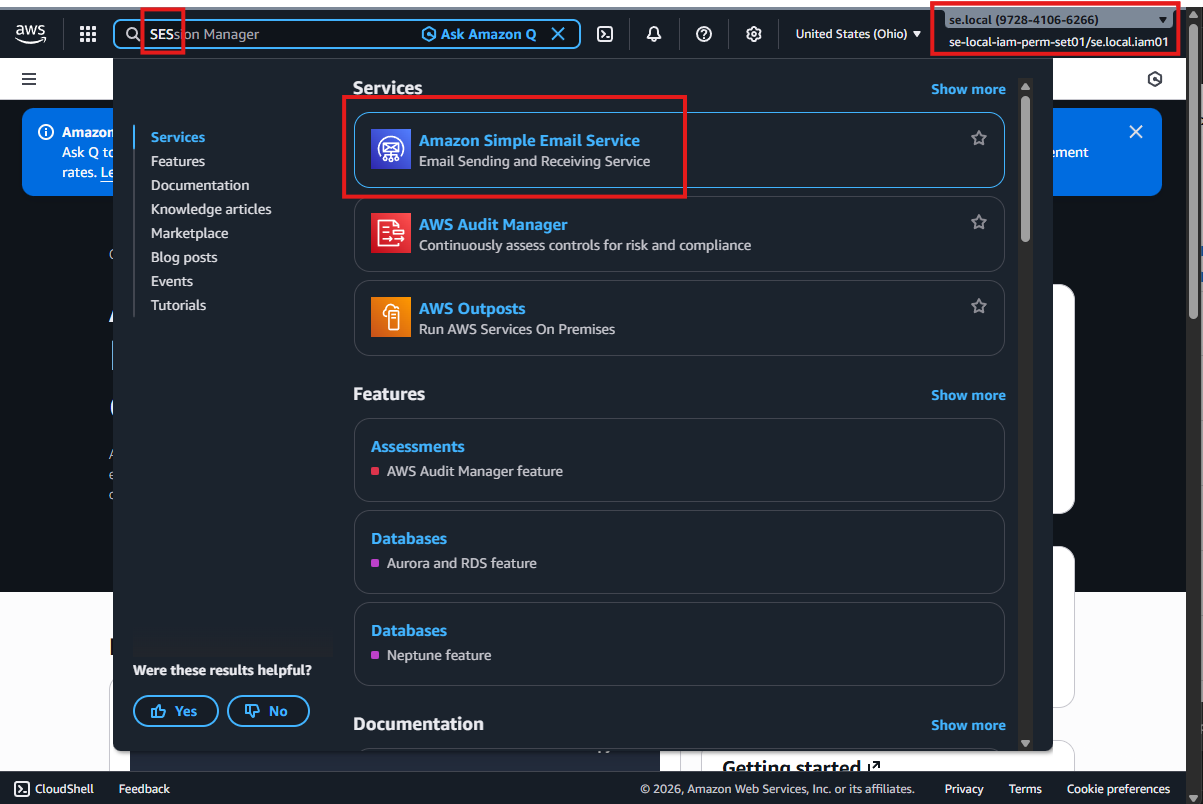
1.3 Navigate to Amazon SES
After login, navigate to Amazon Simple Email Service (SES).
- Get Started Method
- Alternate Approach
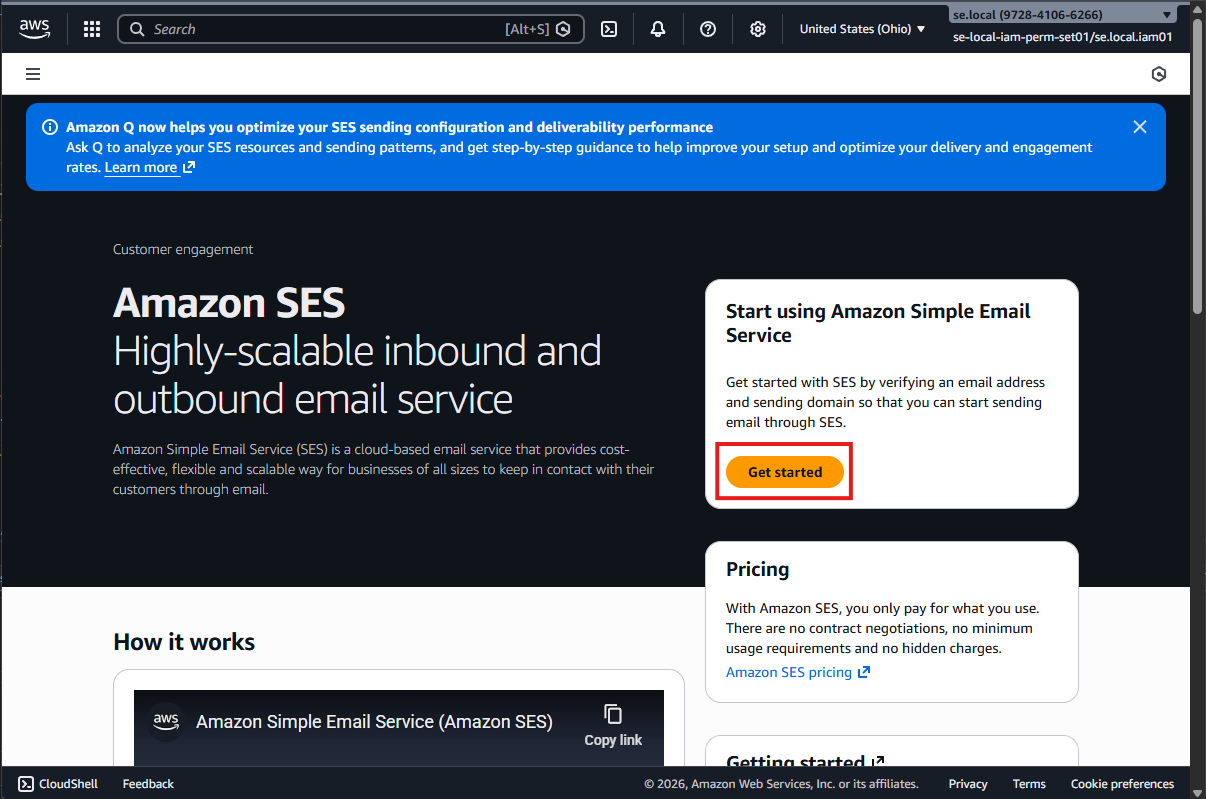
1.4 Click “Get started”
Click Get started to begin SES setup.
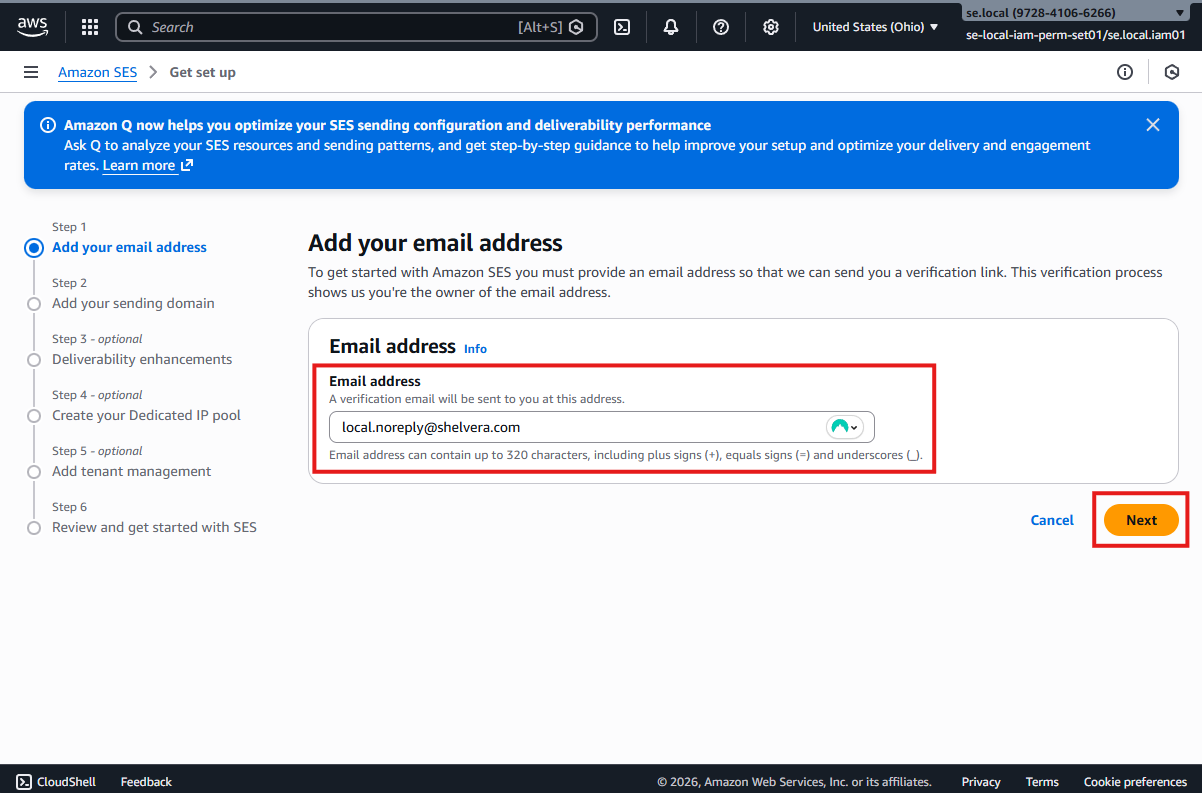
1.5 Enter From Email Address
Enter the following From email address:
dev.noreply@shelvera.comClick Next to continue.
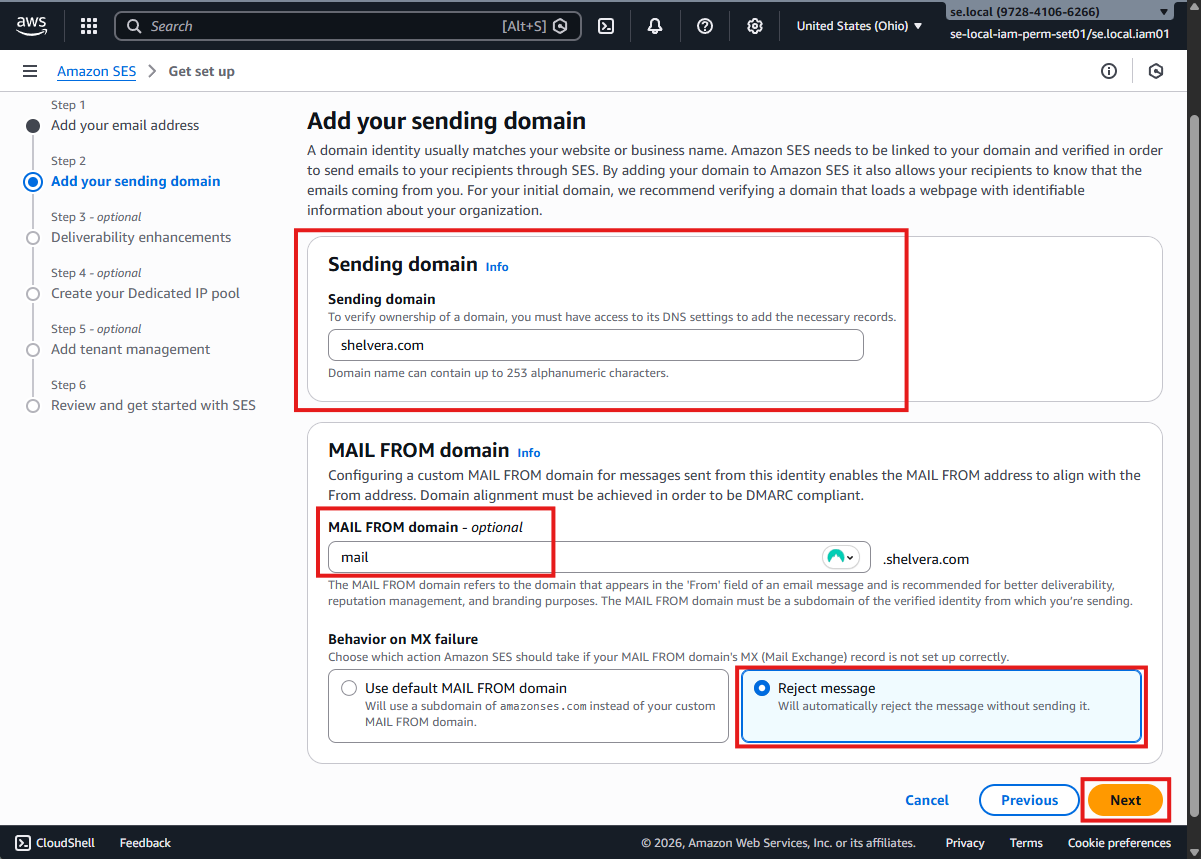
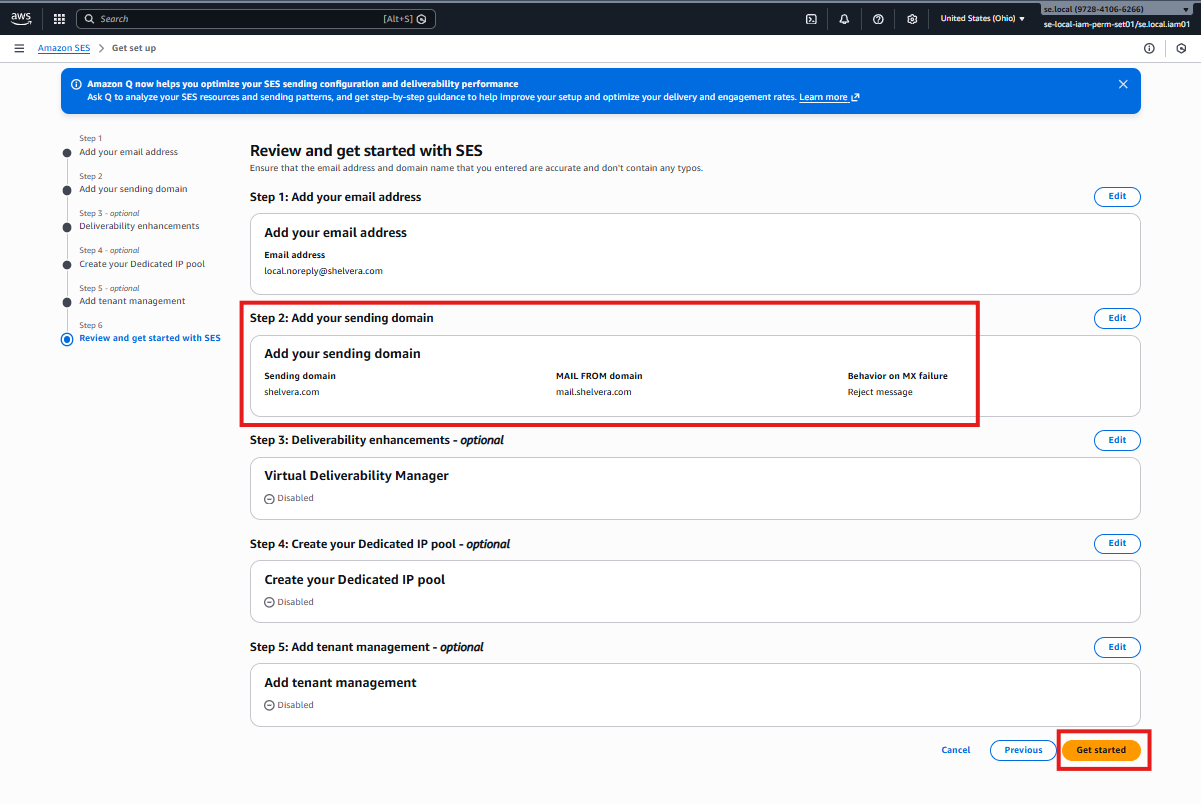
1.6 Add Sending Domain and Configure MAIL FROM
1.6.1 Add Your Sending Domain
Add the following Sending domain in Amazon SES:
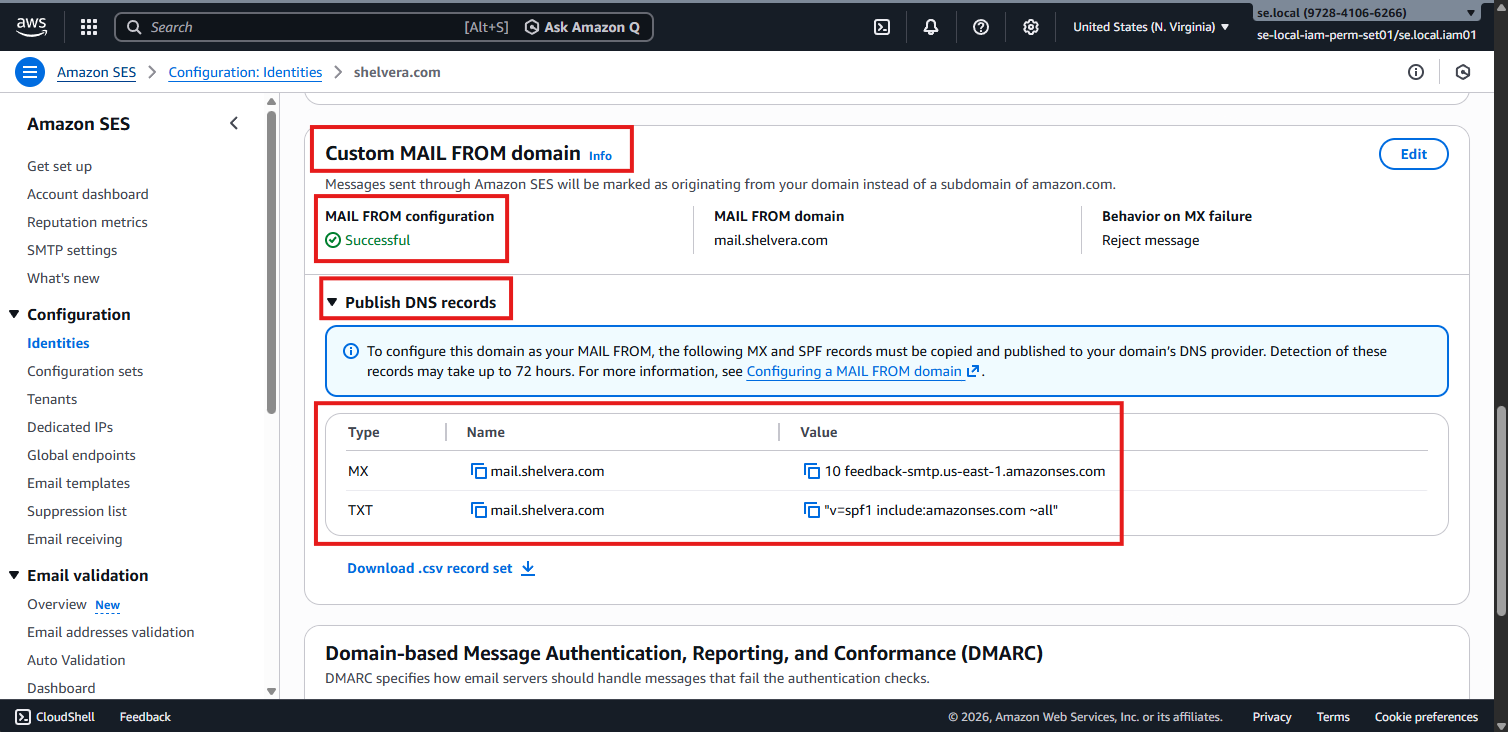
shelvera.com1.6.2 Configure MAIL FROM Domain
Configure the MAIL FROM settings as follows:
MAIL FROM domain:
mailBehavior on MX failure:
Reject message
Click Next to continue.
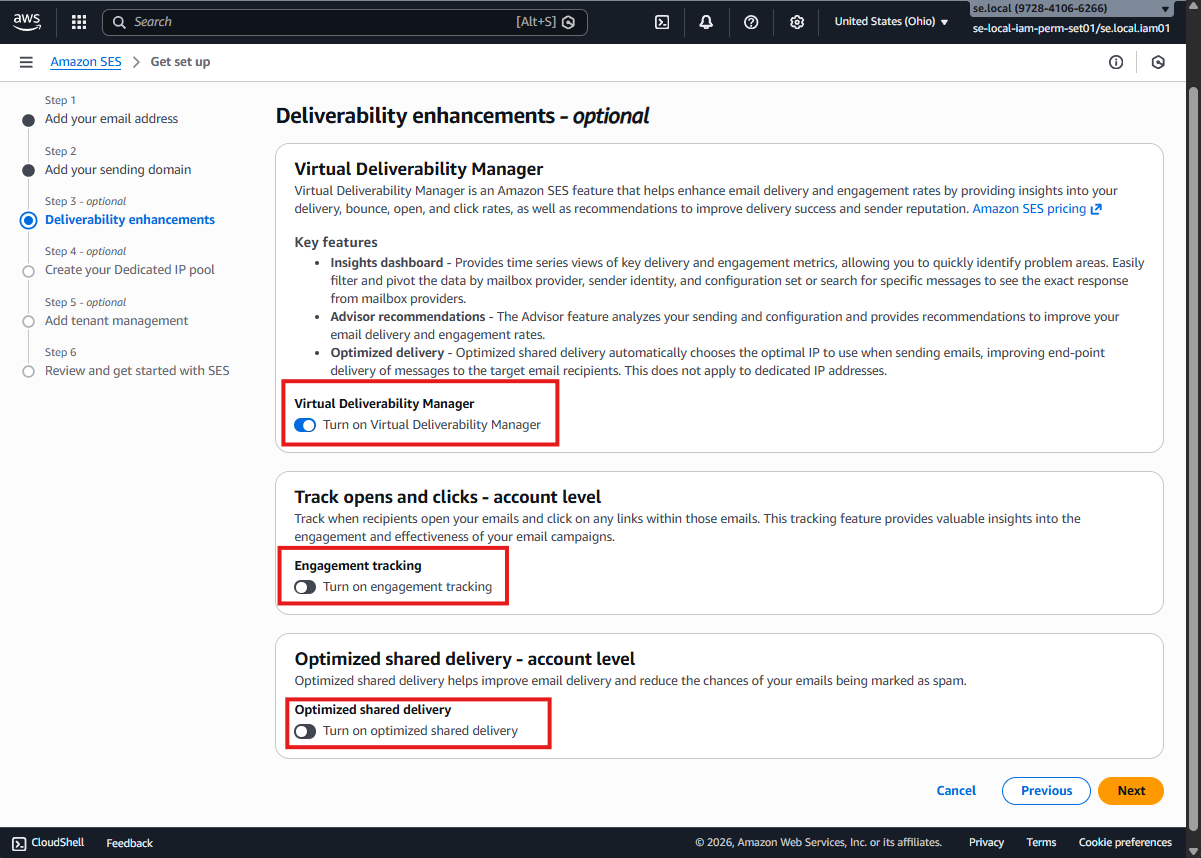
1.7 Configure Deliverability Enhancements
1.7.1 Disable Account-Level Deliverability Options
Turn OFF the following deliverability options:
Optimized shared delivery:
OFF (account level)Engegement tracking:
OFF (account level)Virtual Deliverability Manager:
OFF (account level)
Click Next to continue.

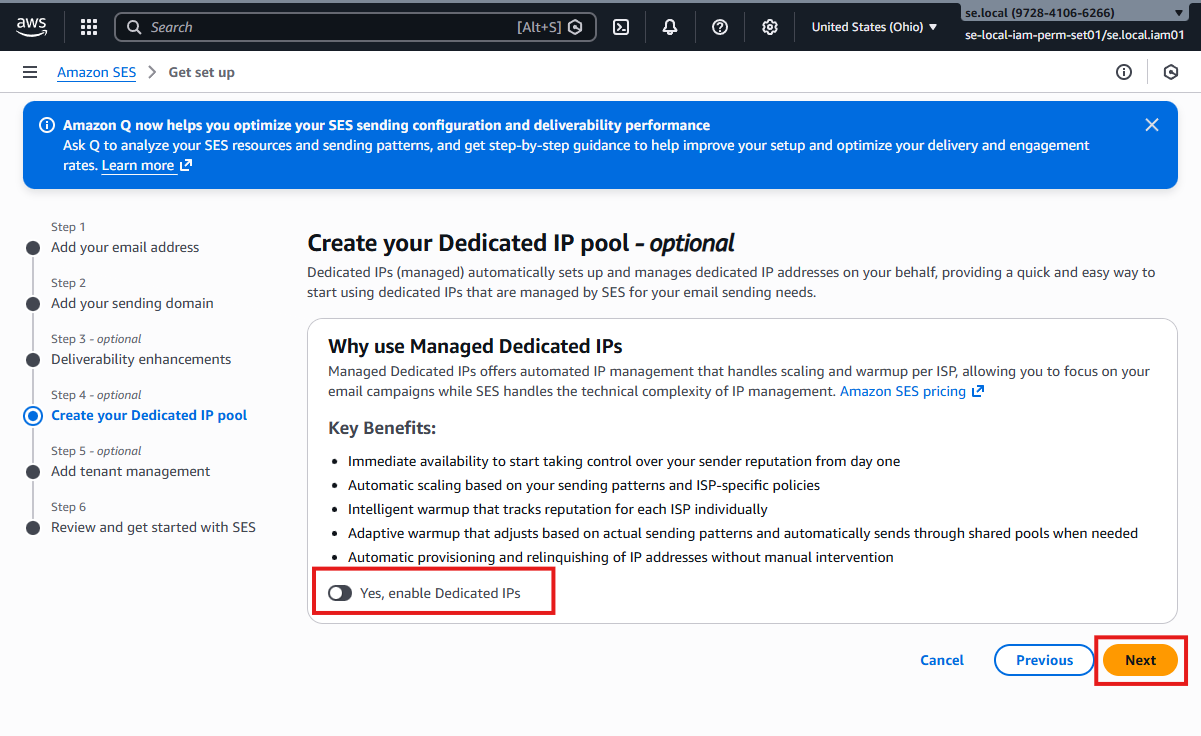
1.7.2 Create Dedicated IP Pool
Create your Dedicated IP pool with default settings.
- Leave all options unchanged
Click Next to continue.
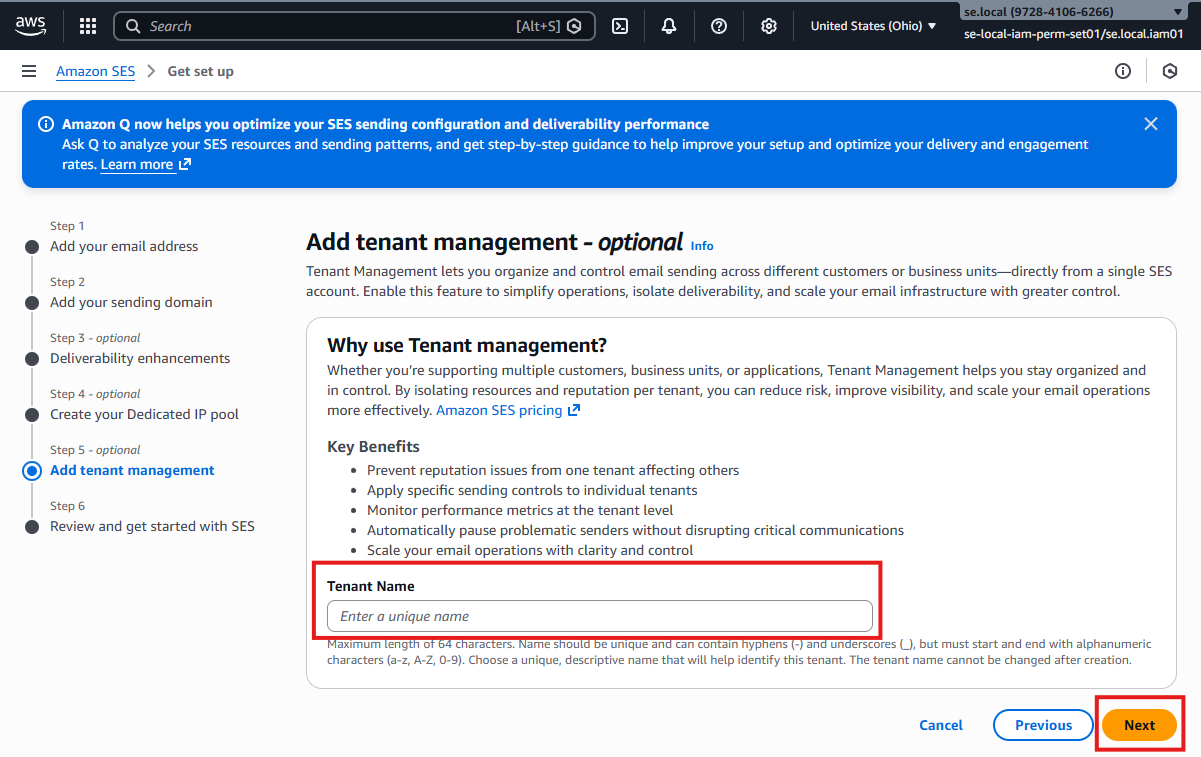
1.7.3 Tenant Management
Leave Tenant management settings unchanged.
Click Next to continue.
1.7.4 Review and Get Started
Review the configuration summary.
Click Get started to finalize the SES setup.
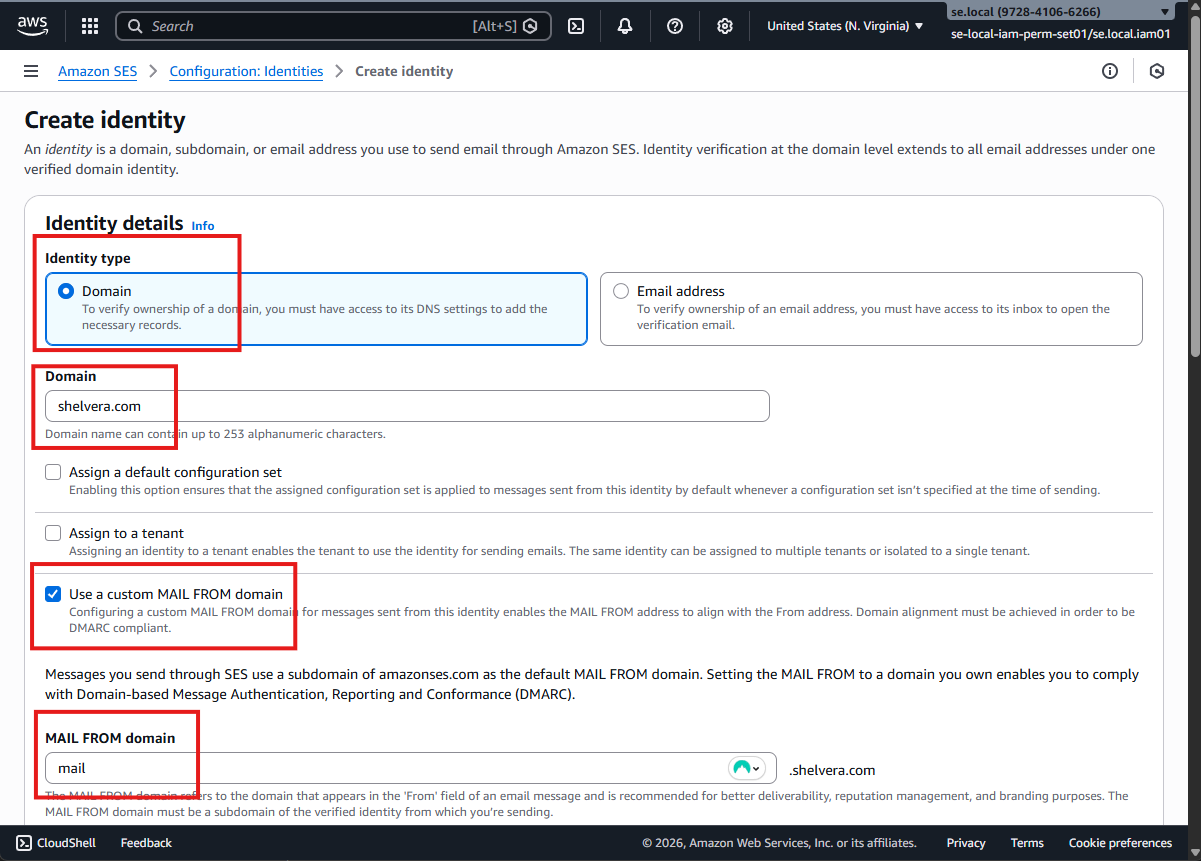
1.4 Create Identity (Alternate Flow)
This alternate method creates the SES identity directly.
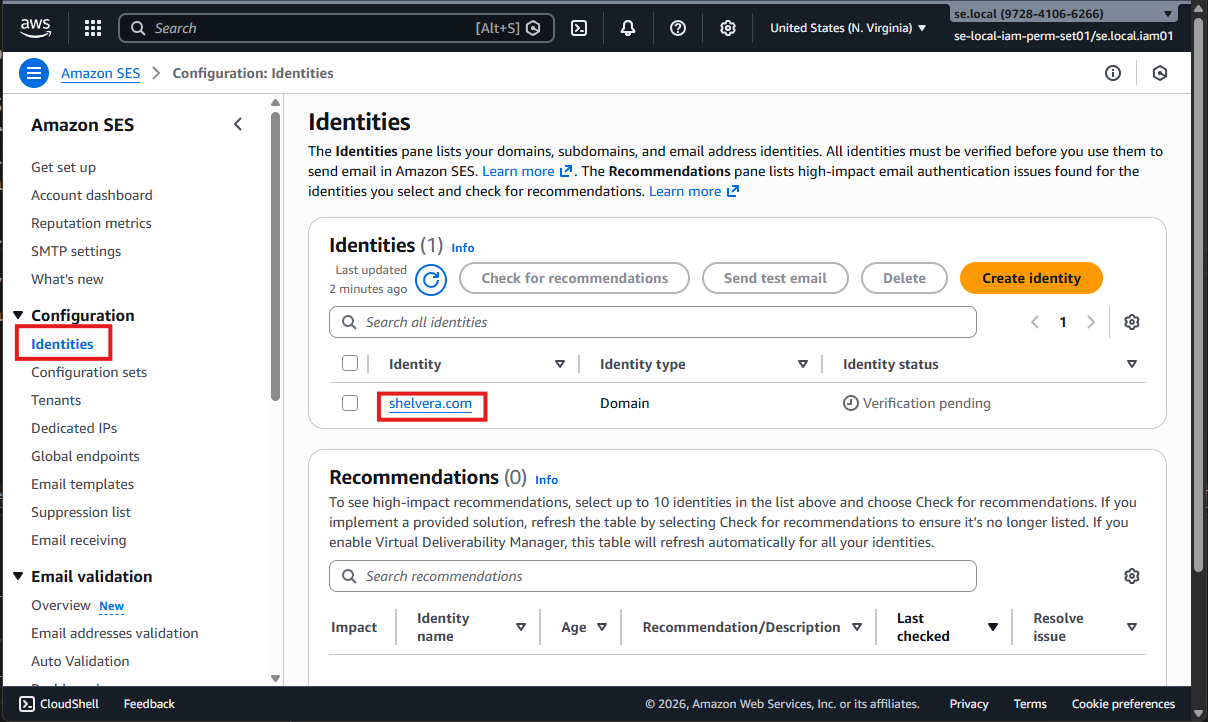
1.4.1 Open Identities
- Click Identities
- Click Create identity

1.4.2 Identity Type and Domain
Configure the identity details:
Identity type:
DomainDomain:
shelvera.comEnable:
Use custom MAIL FROM domainMAIL FROM domain:
mail
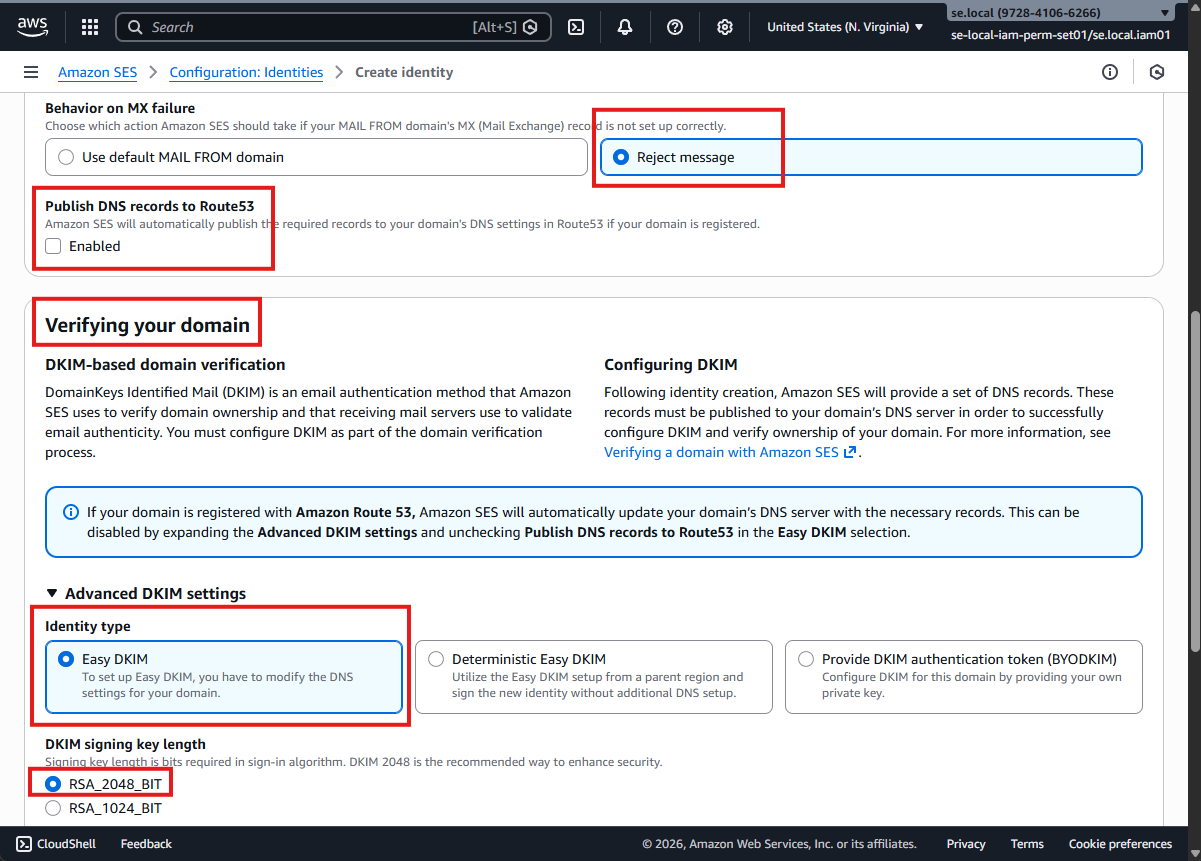
1.4.3 Configure MAIL FROM Domain
Behavior on MX failure:
Reject messageUnselect:
Publish DNS records to Route 53Identity type:
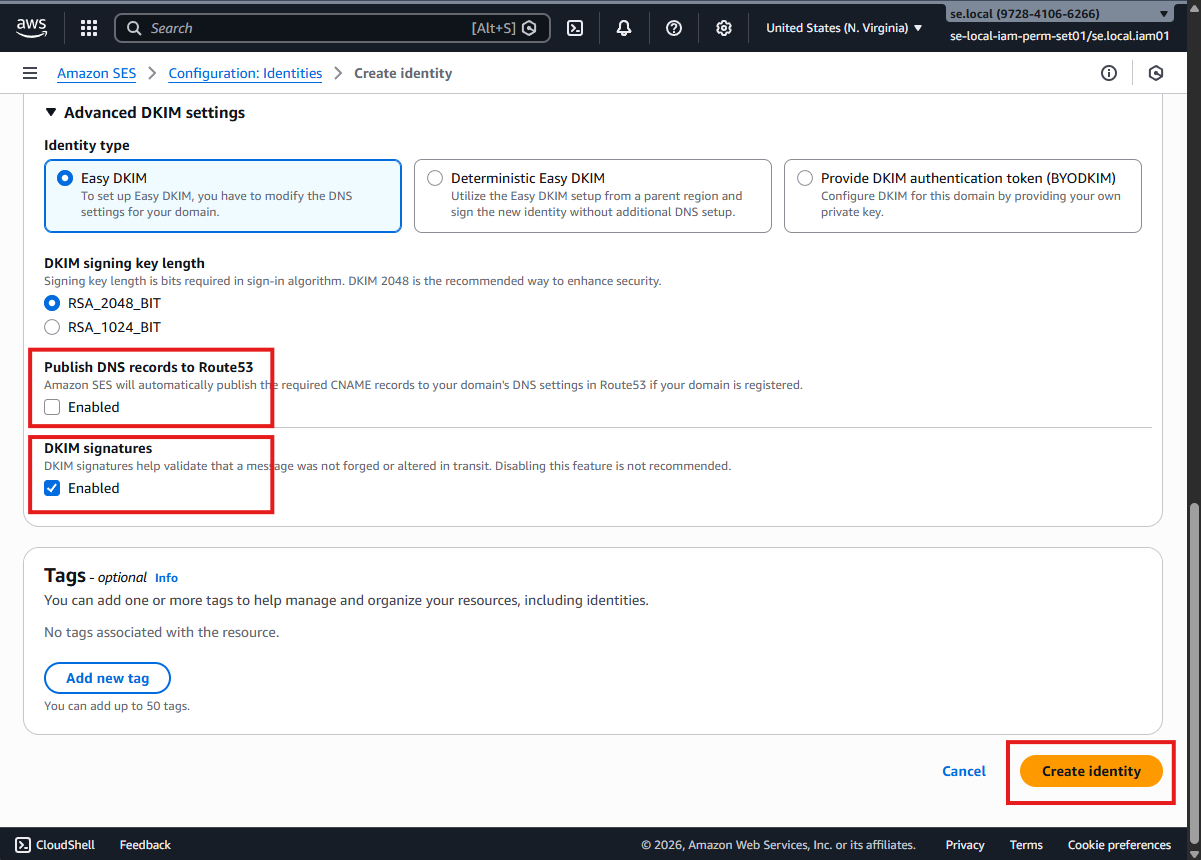
Easy DKIMDKIM signing key length:
RSA_2048_BITUnselect:
Publish DNS records to Route 53DKIM signatures:
Enabled (default)
Verifying Your Domain (DKIM)
Click Create identity to complete the setup.
2. Domain Verification
2.1 Open SES Identity
- Go to Amazon SES
- Click Identities
- Click the newly created domain identity
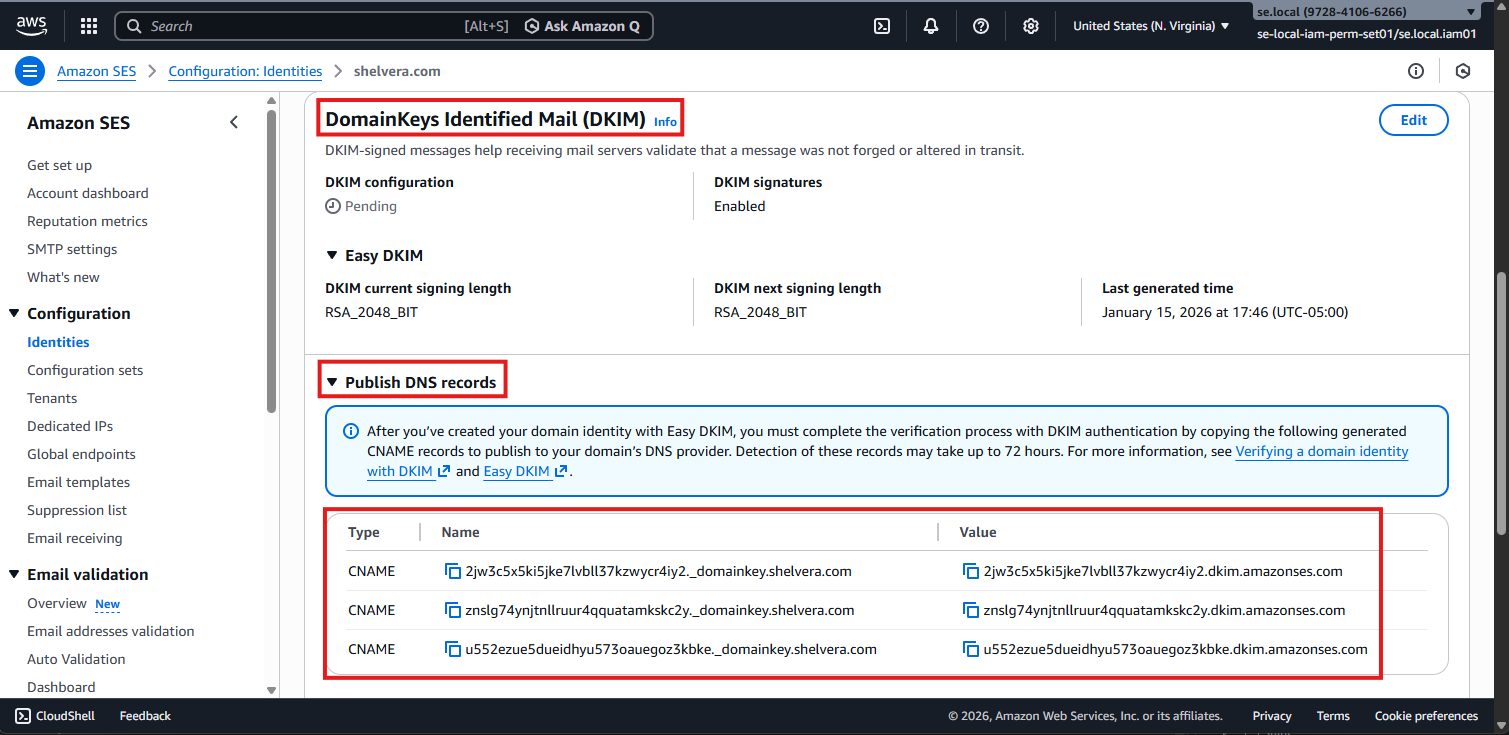
2.2 Locate DKIM DNS Records
Scroll down to DomainKeys Identified Mail (DKIM) and click Publish DNS records.
2.3 Login to Cloudflare
Login to Cloudflare:
Select the following domain:
shelvera.com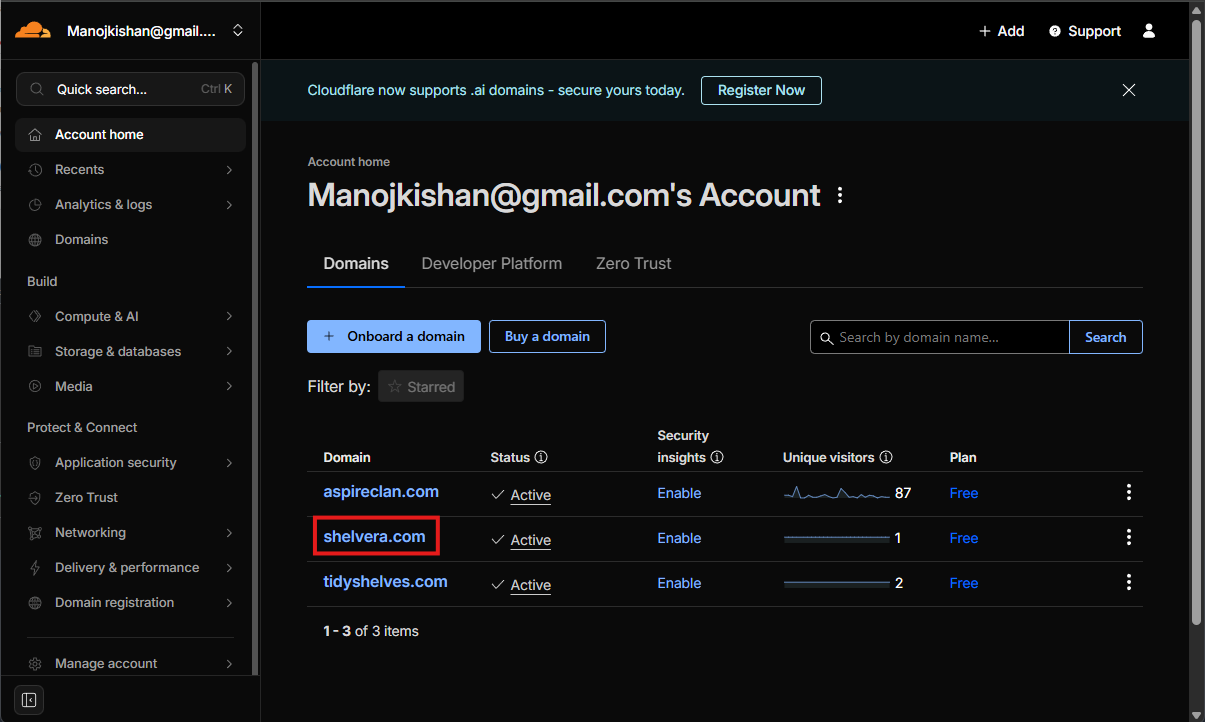
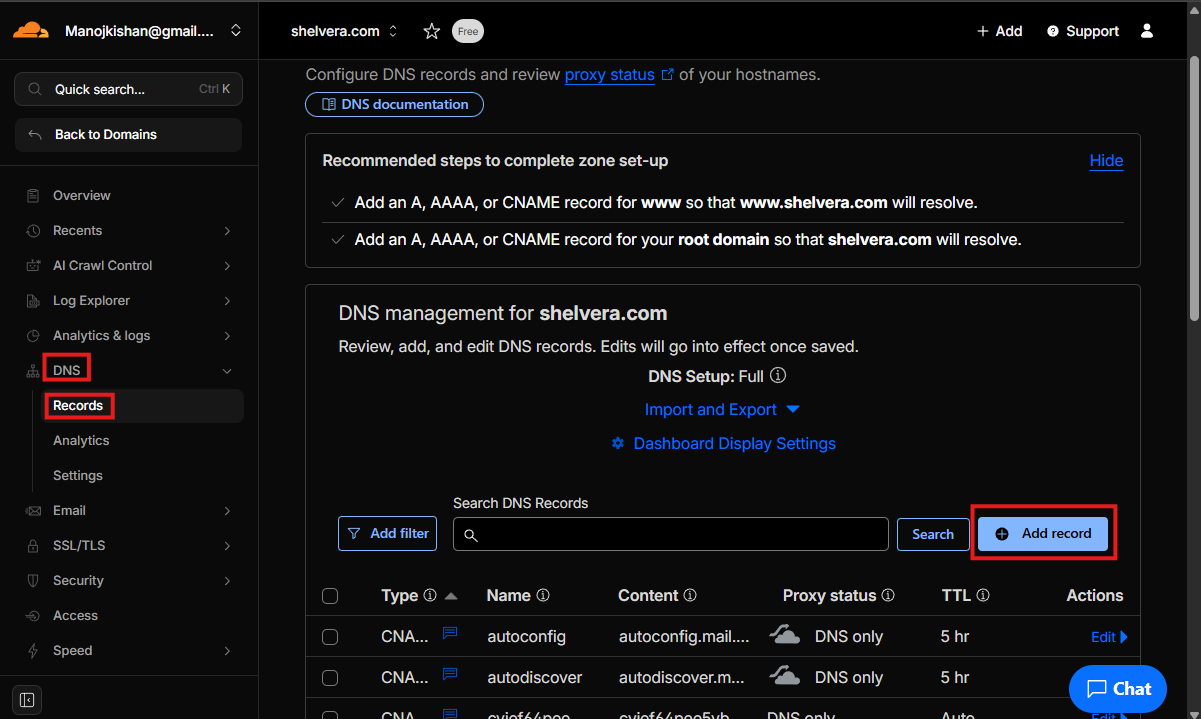
2.4 Add DKIM CNAME Records in Cloudflare
- Go to DNS → Records
- Click Add record
Create all CNAME records exactly as shown in Amazon SES.
For each DNS record:
Type:
CNAMEName / Target:
Copy exactly from SESComment:
SE SES DEV- TTL → Auto
- Do the same for Custom MAIL FROM domain (if the DNS records are not present already)
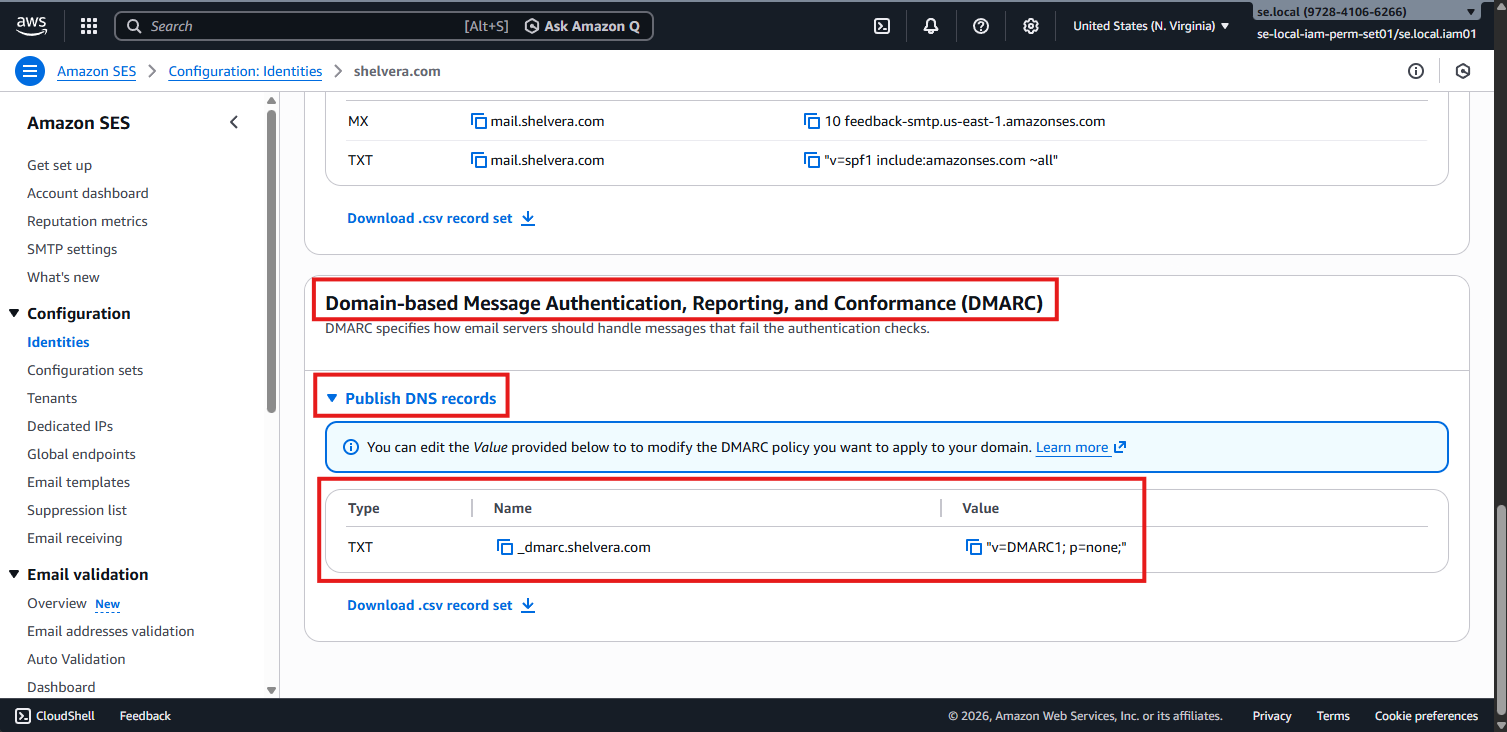
- Do the same for Domain-based Message Authentication, Reporting, and Conformance (DMARC) (if the DNS records are not present already)
2.5 Wait for DKIM Verification
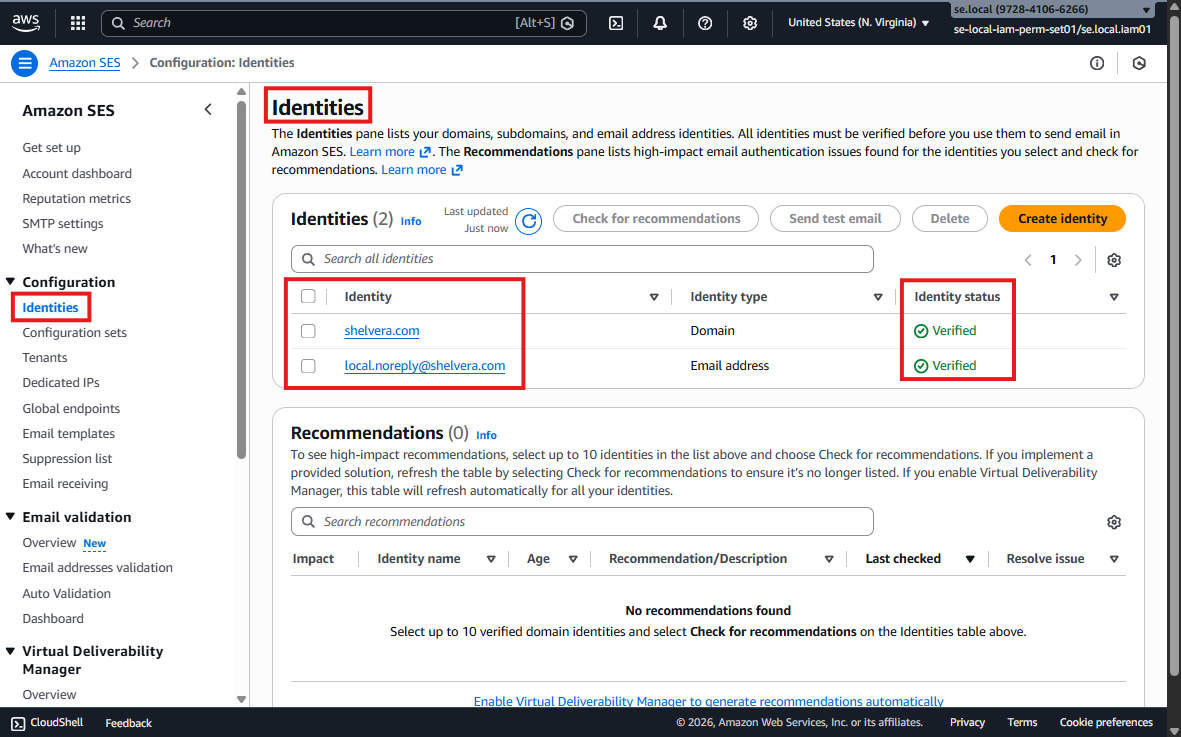
Return to Amazon SES and wait for the domain verification status to change to:
VerifiedThis may take a few minutes. No further action is required once verified.
2.6 Create Email Identity (Alternate Approach)
Create a new Email identity in Amazon SES.
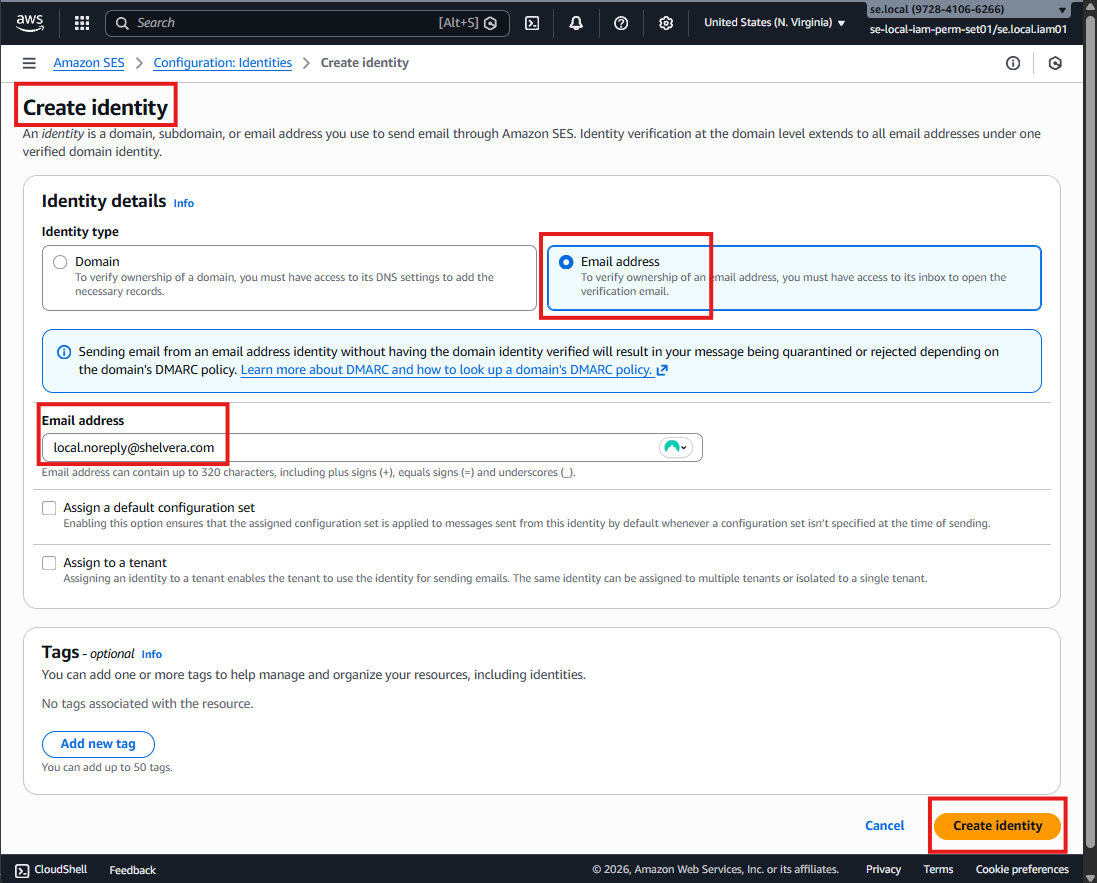
2.6.1 Create New Identity (Email)
- Click Create identity
Identity type:
Email addressEnter email address:
dev.noreply@shelvera.comClick Create identity
2.6.2 Verify Email Address
A verification email will be sent to the provided email address.
- Open the verification email
- Click the verification link
The email identity should be verified immediately after clicking the link.
2.6.3 AWS SES Production Access – Support Request Response
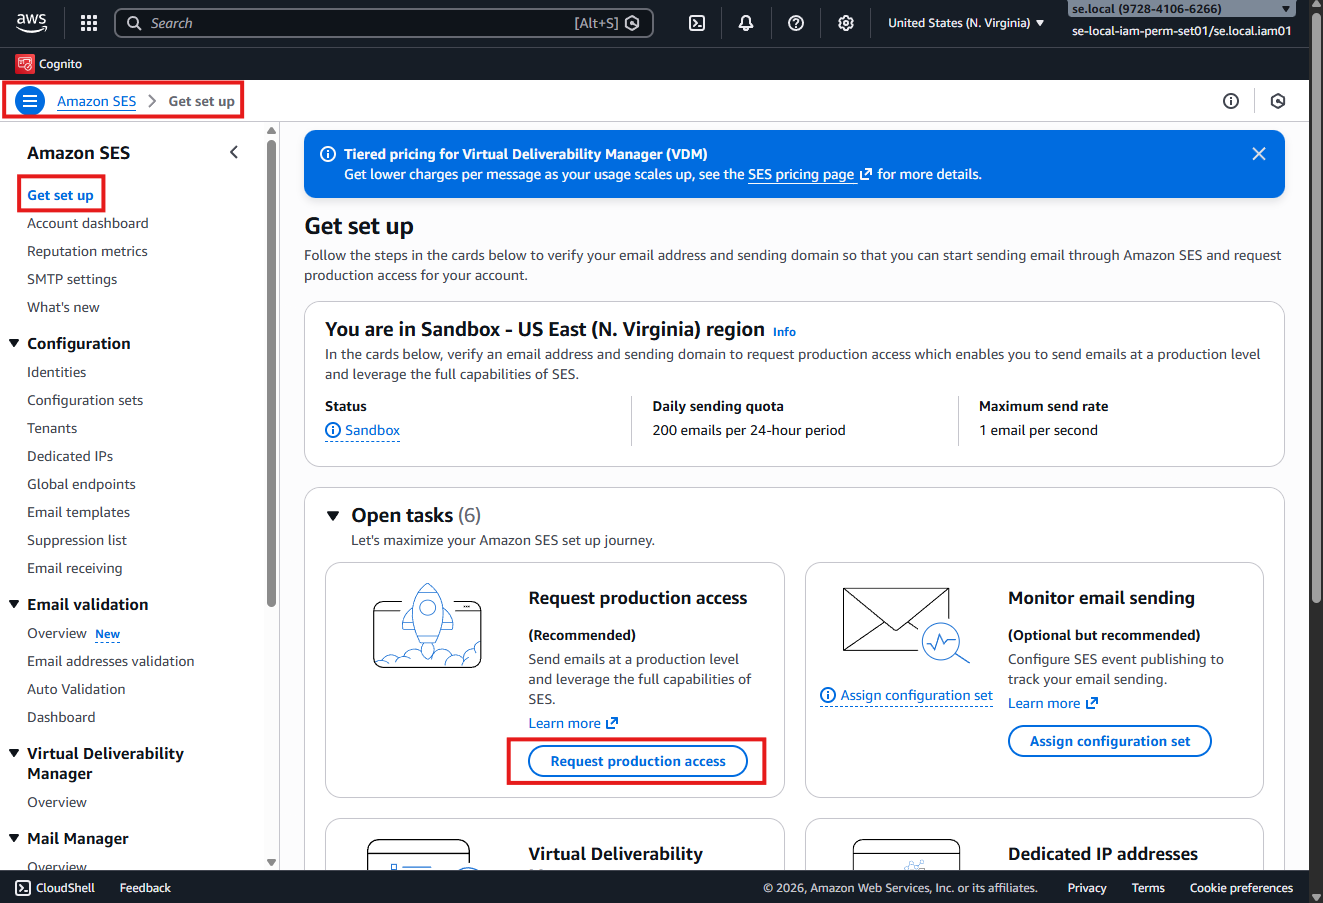
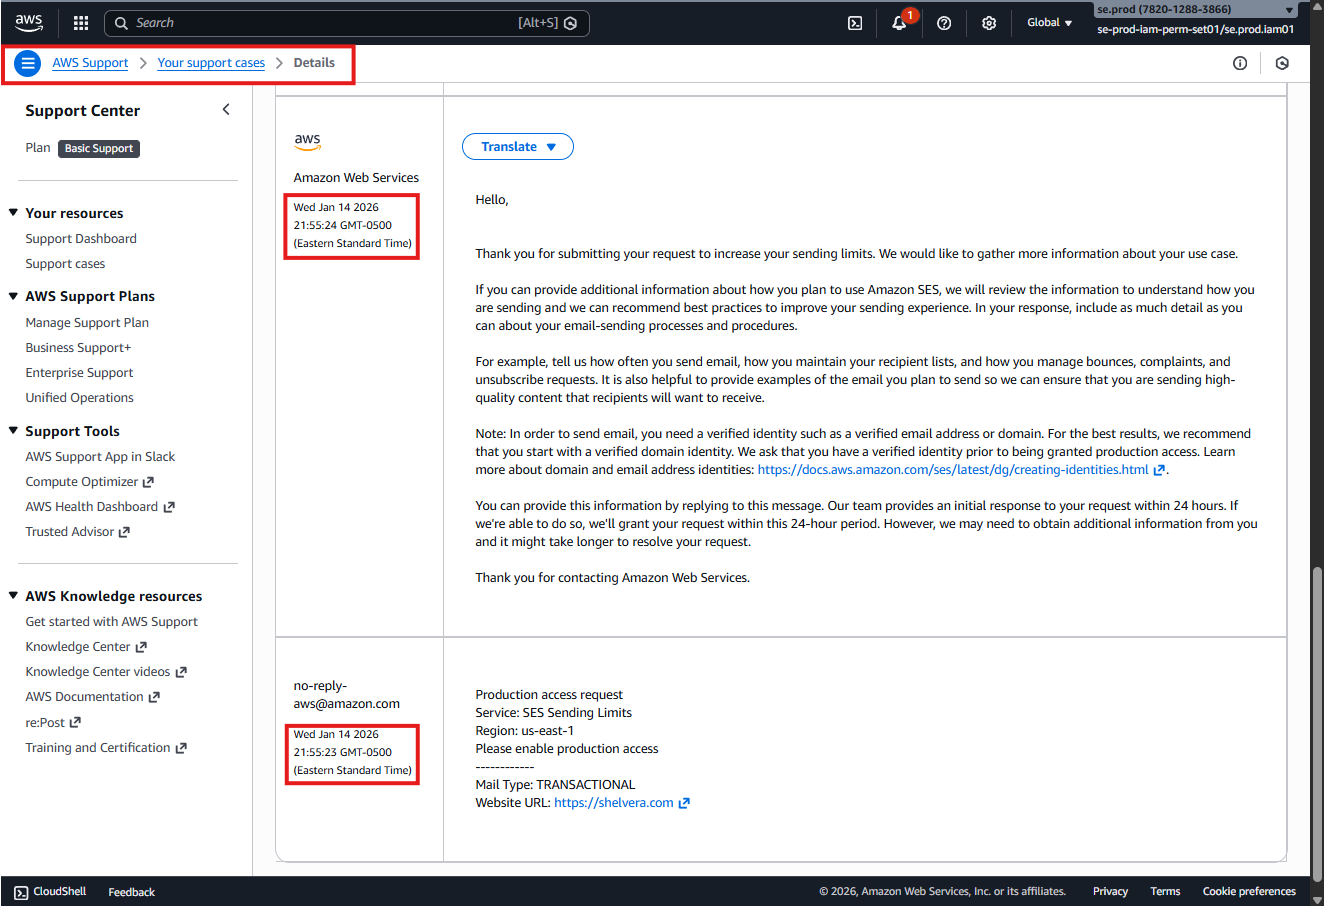
After verifying the email identity, submit a request to move Amazon SES out of the sandbox and increase sending limits. Use the following response if further details are asked by the AWS Team.
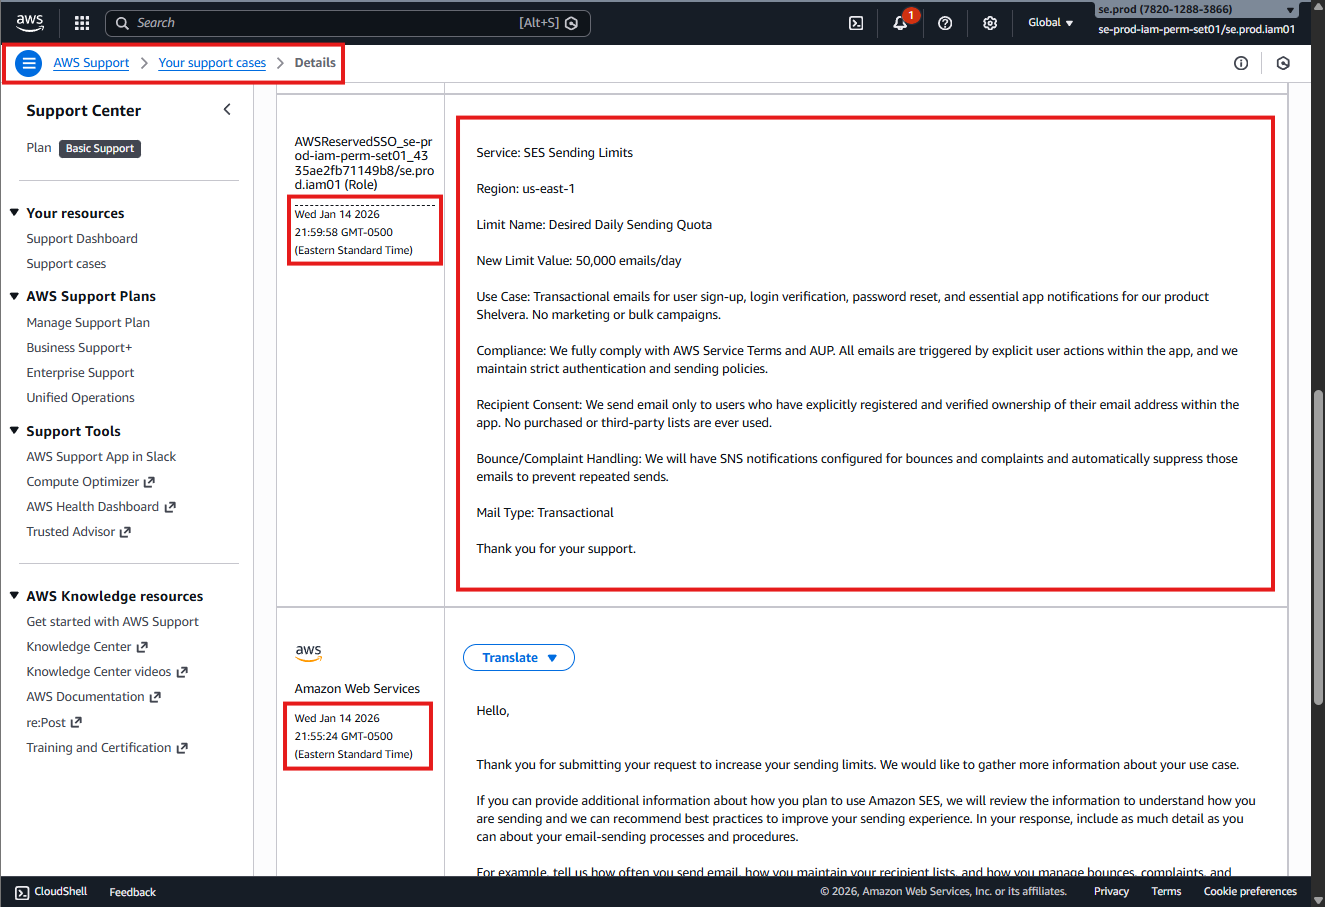
Service: SES Sending Limits
Region: us-east-1
Limit Name: Desired Daily Sending Quota
New Limit Value: 50,000 emails/day
Use Case:
Transactional emails for user sign-up, login verification, password reset,
and essential application notifications for our product Shelvera.
No marketing or bulk campaigns are sent.
Compliance:
We fully comply with AWS Service Terms and the Acceptable Use Policy (AUP).
All emails are triggered by explicit user actions within the application,
and we enforce strict authentication and sending policies.
Recipient Consent:
Emails are sent only to users who have explicitly registered and verified
ownership of their email address within the application.
No purchased, scraped, or third-party mailing lists are ever used.
Bounce and Complaint Handling:
We configure Amazon SNS notifications for bounces and complaints and
automatically suppress affected email addresses to prevent repeated sends.
Mail Type: Transactional
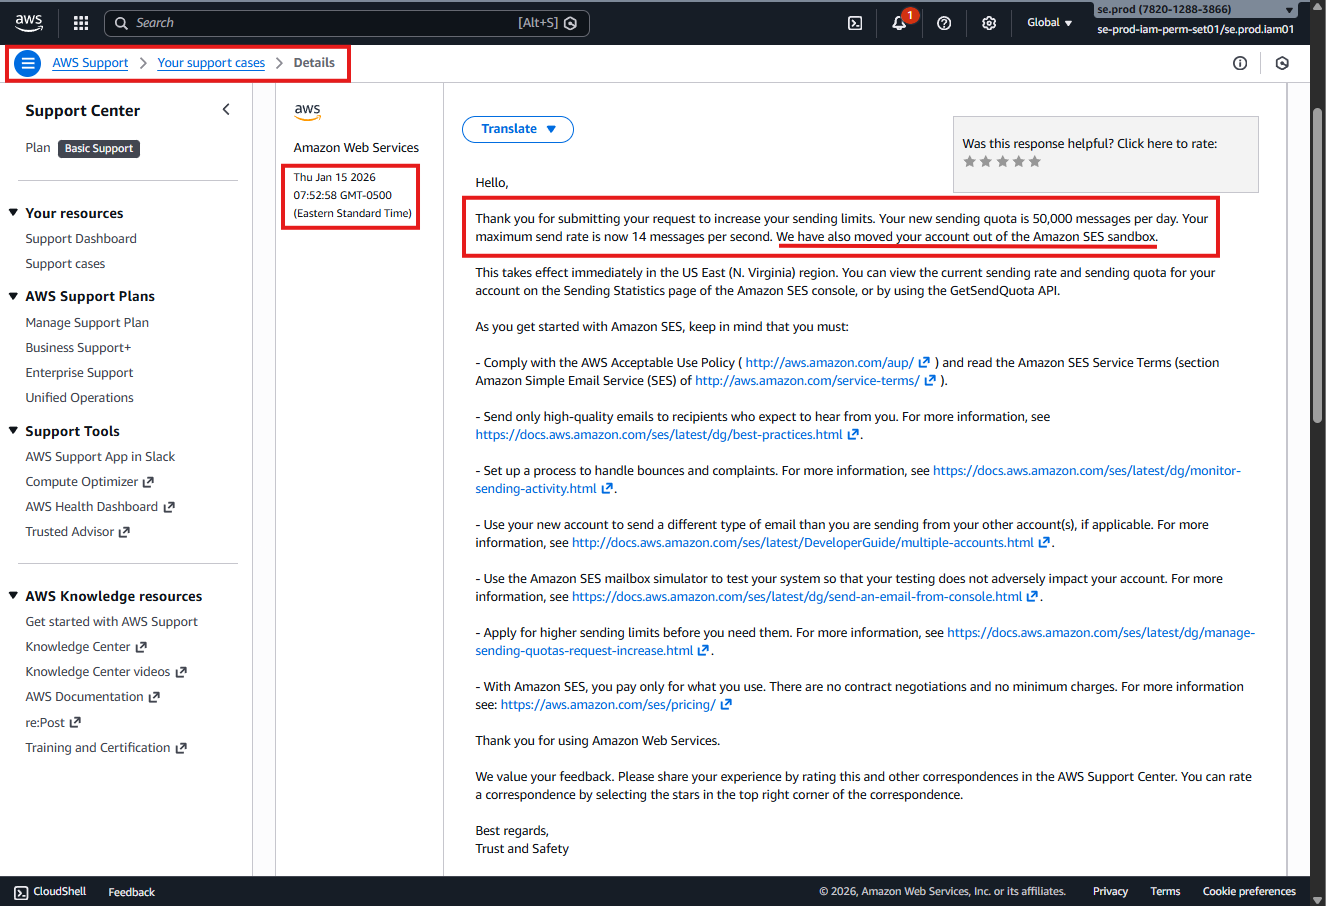
Thank you for your support.AWS typically reviews and approves legitimate transactional use cases within 24–48 hours.