AWS IAM User Setup
🧱 Service Inputs
AWS IAM User Configuration Steps
1. Login to AWS Portal as Aspireclan AWS Root User
1.1 Open the AWS Console
Open the AWS Portal and sign in using your AWS Root account.
1.2 Confirm you are signed in as the root/admin session
Verify you are signed in and ready to proceed with IAM Identity Center configuration.
2. Permission Sets
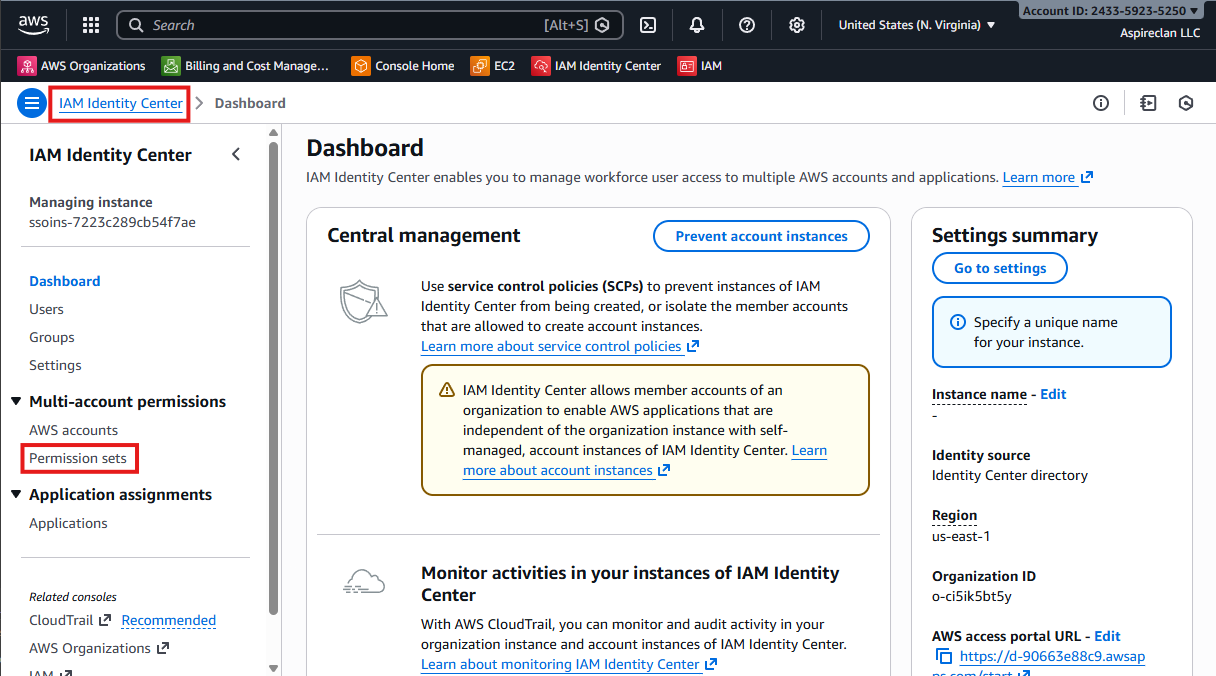
2.1 Open IAM Identity Center
Open AWS IAM Identity Center.
2.2 Navigate to Permission sets
Navigate to Permission sets. You will create (or verify) permission sets here before assigning access.
- Go to IAM Identity Center
- Click Permission sets
3. New Permission Set
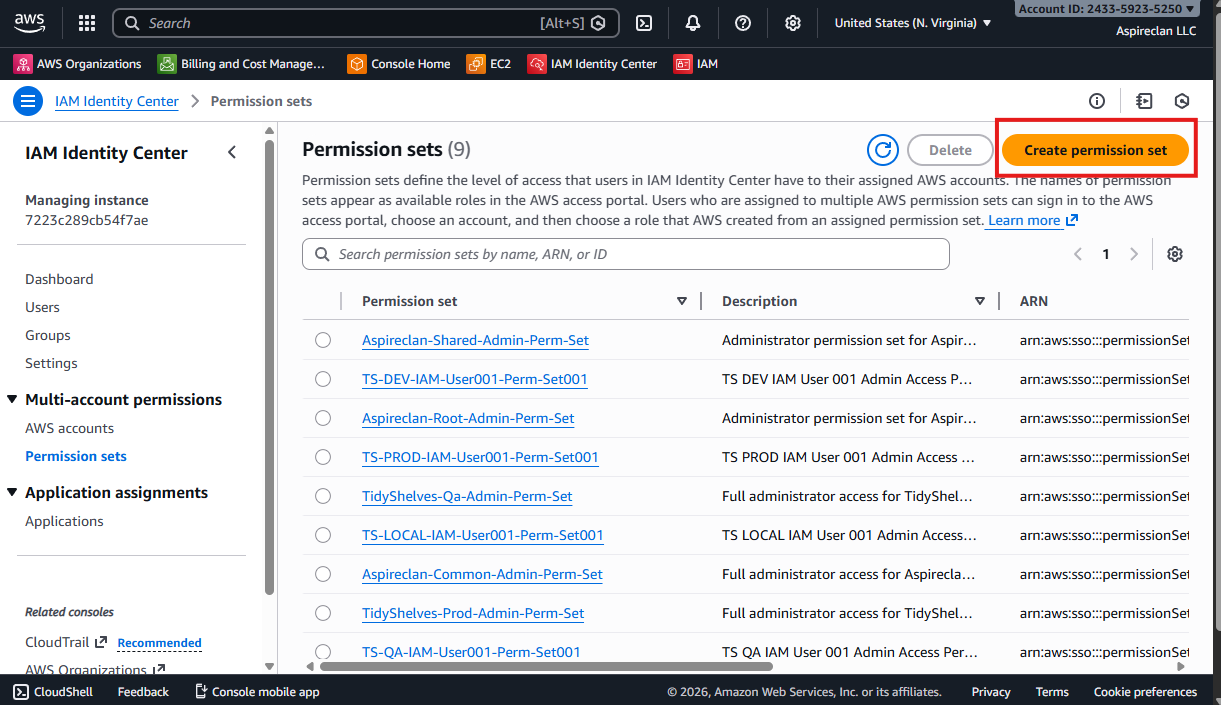
3.1 Start creating a new permission set
Create a new permission set in AWS IAM Identity Center.
- From IAM Identity Center, go to Permission sets
- Click Create permission set
3.2 Purpose of the permission set
This permission set will later be assigned to users or groups to control access to AWS accounts under the Shelvera Organizational Unit.
4. Fill Permission Set Details
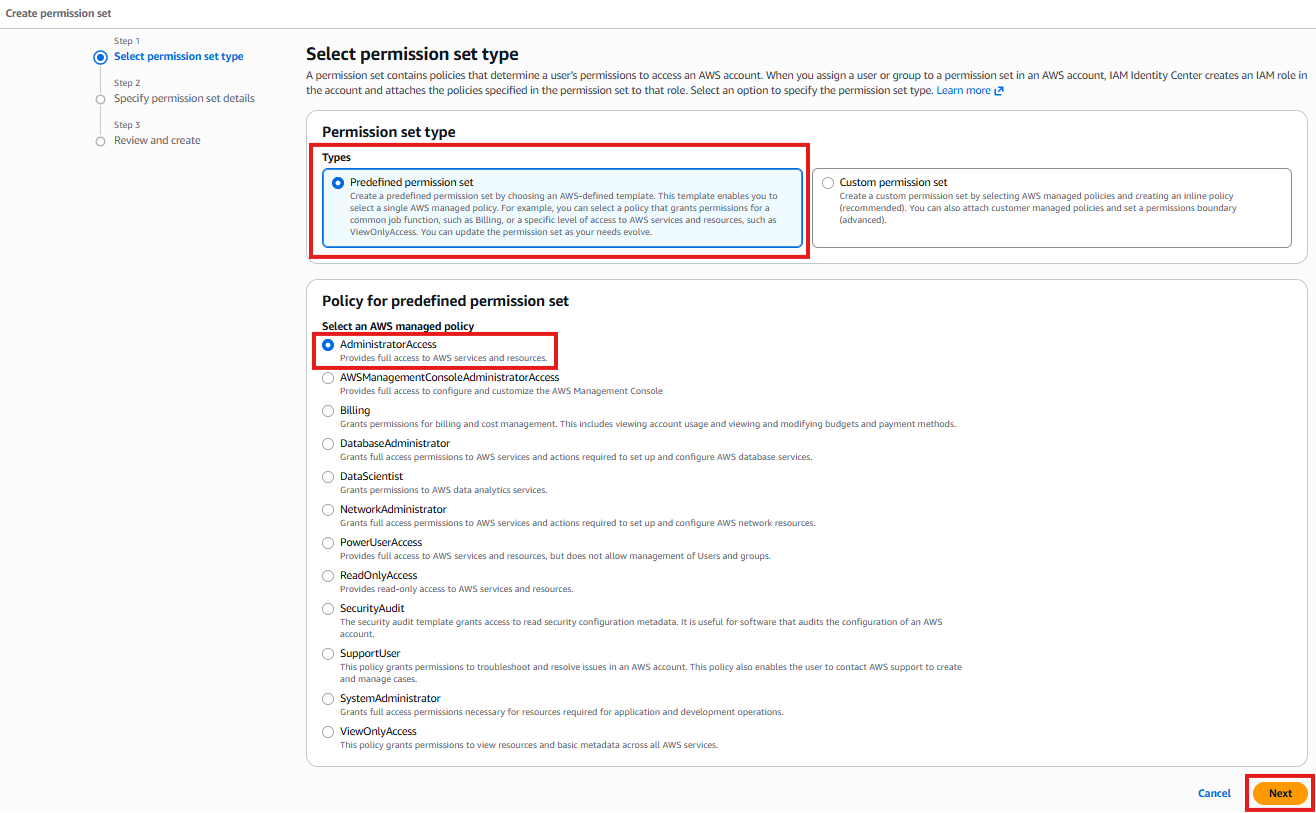
4.1 Choose the permission set type
Configure the permission set by selecting a predefined AWS-managed permission.
4.2 Select AdministratorAccess
- Select Predefined permission set
- Choose AdministratorAccess
- Click Next
5. Permission Set Name and Description
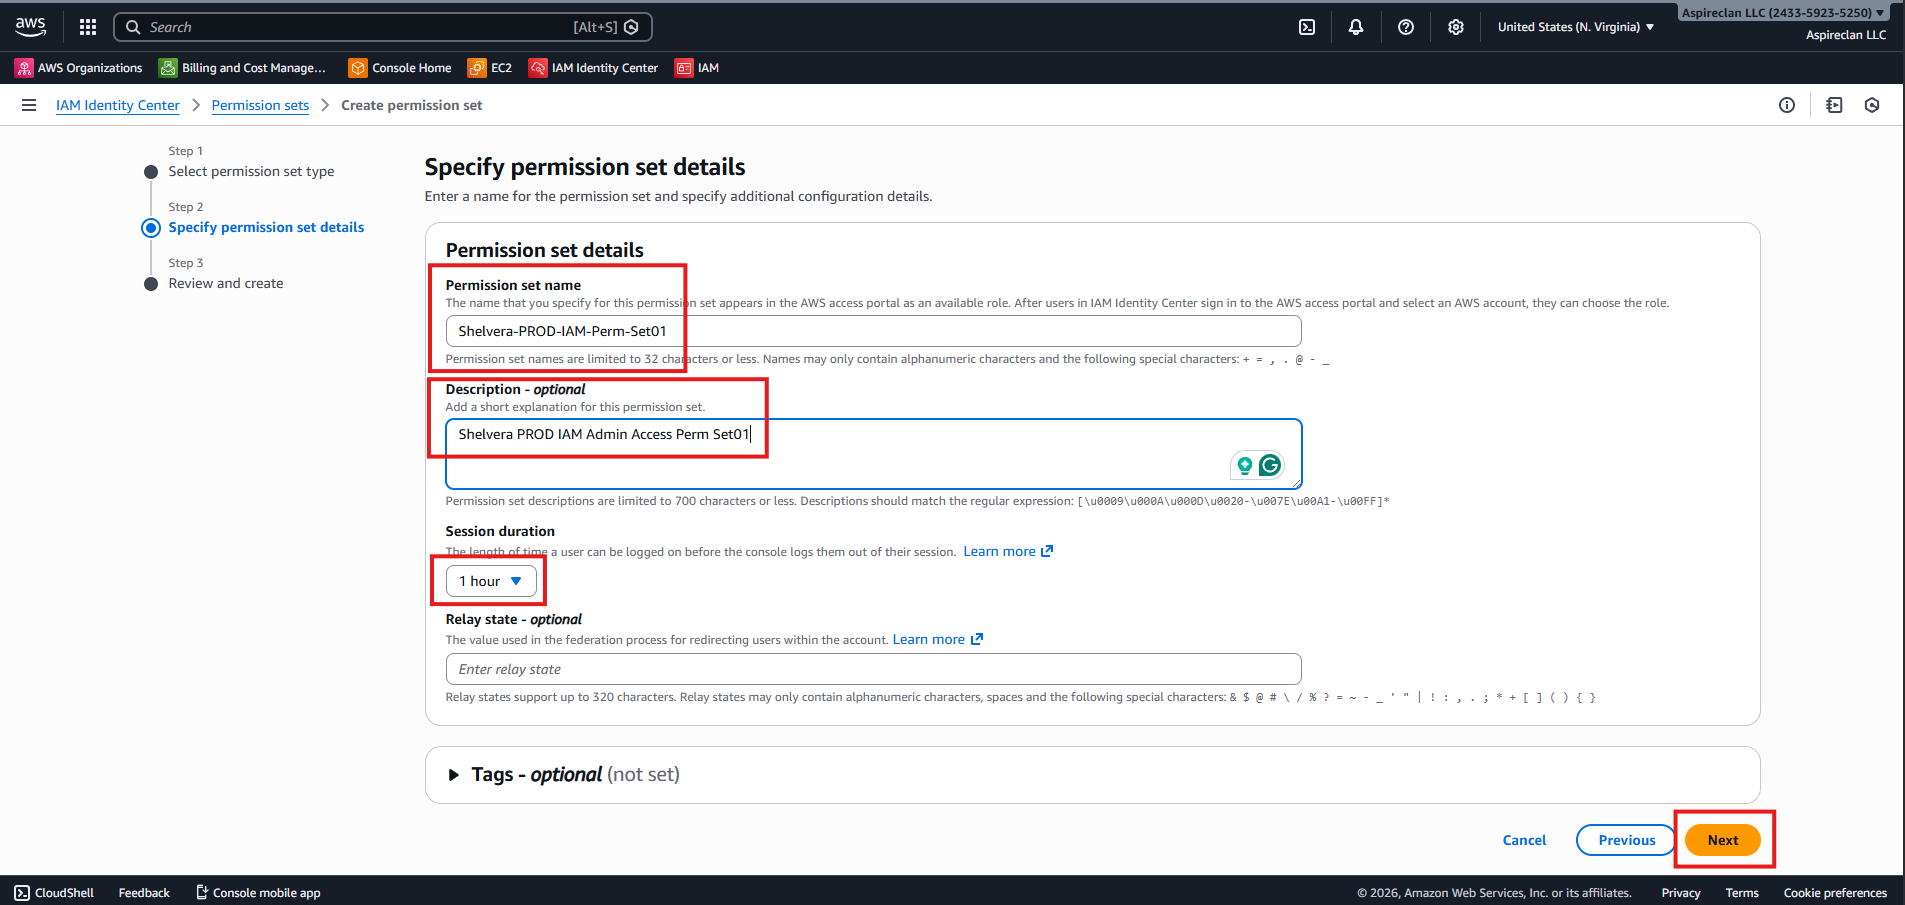
5.1 Enter the permission set name
Provide a clear and consistent name for the permission set.
- Permission Set Name:
se-dev-iam-perm-set01
5.2 Enter the description
Provide a description that matches your naming convention.
- Description:
se dev iam admin access perm set01 - Click Next
6. Review and Create
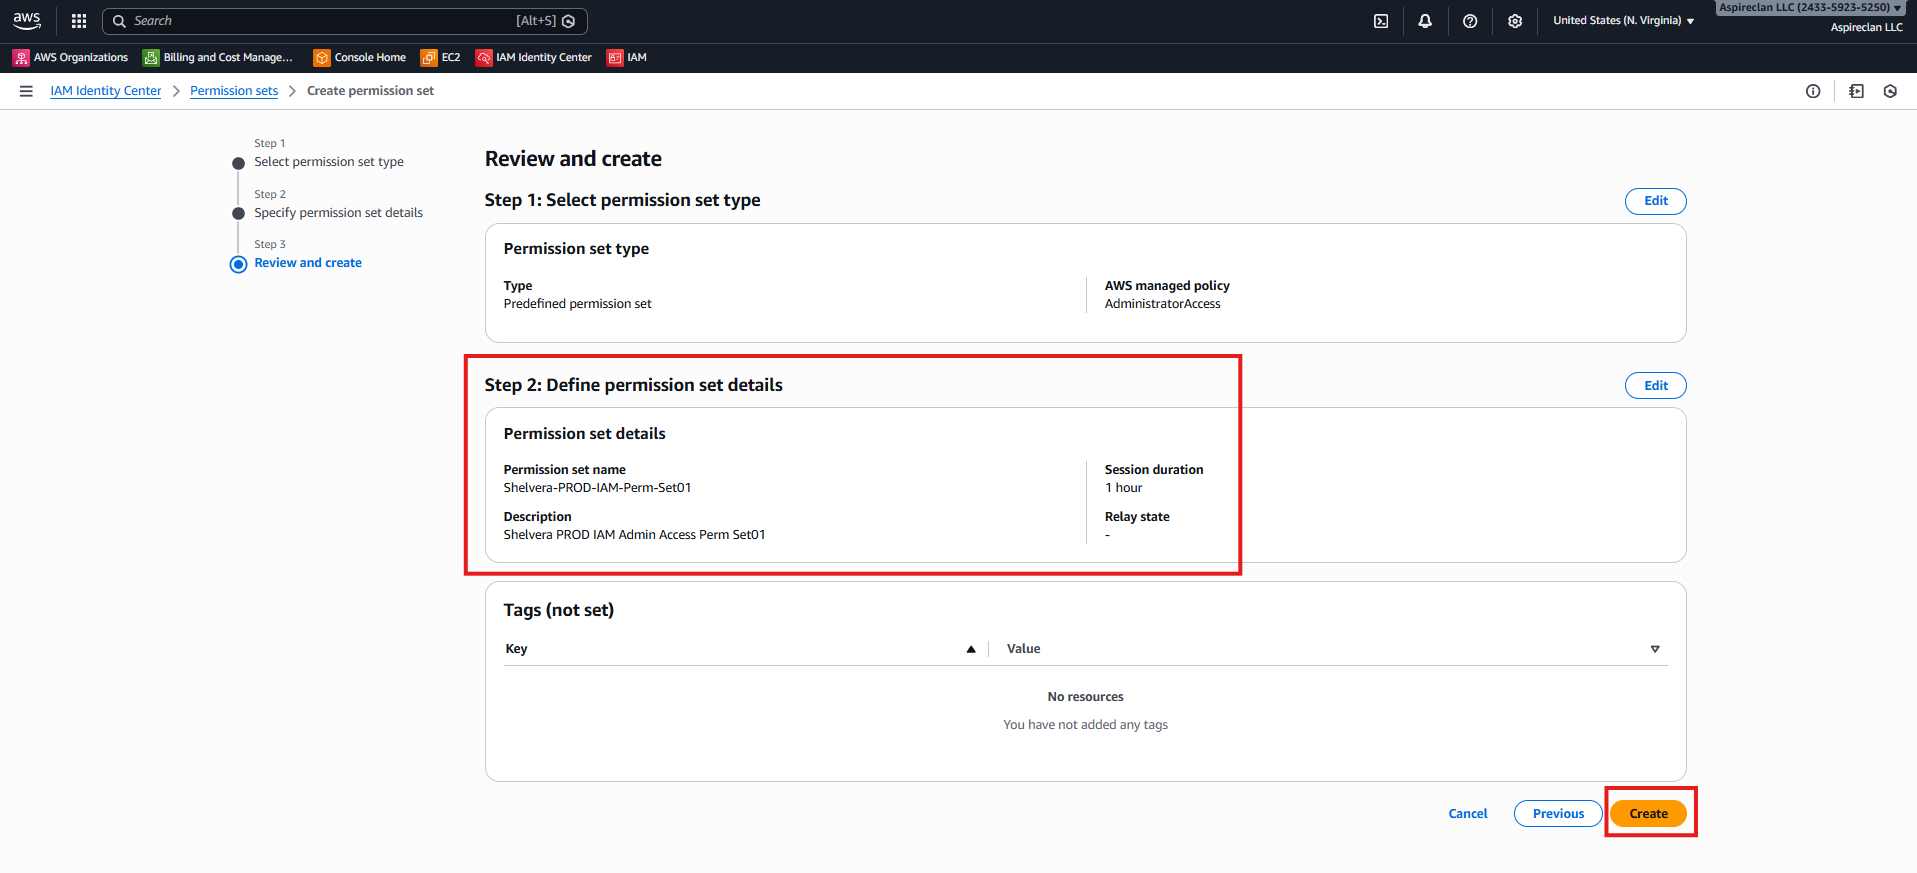
6.1 Review the configuration
Review the permission set configuration to ensure all details are correct.
6.2 Create the permission set
- Review the permission set summary
- Confirm AdministratorAccess is selected
- Verify the name and description
- Click Create
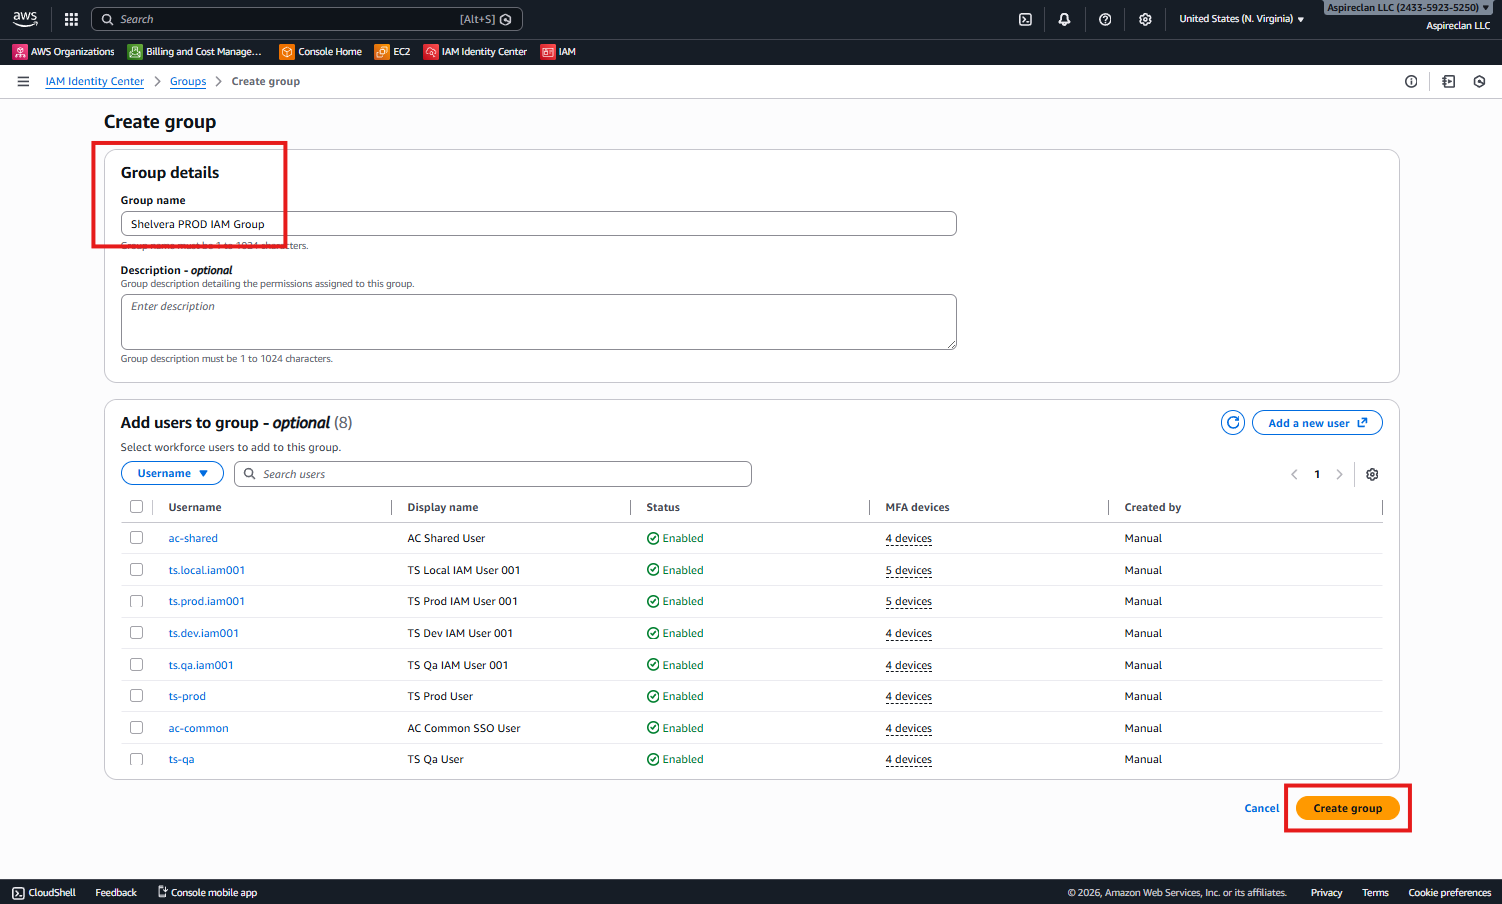
7. Create New User Group
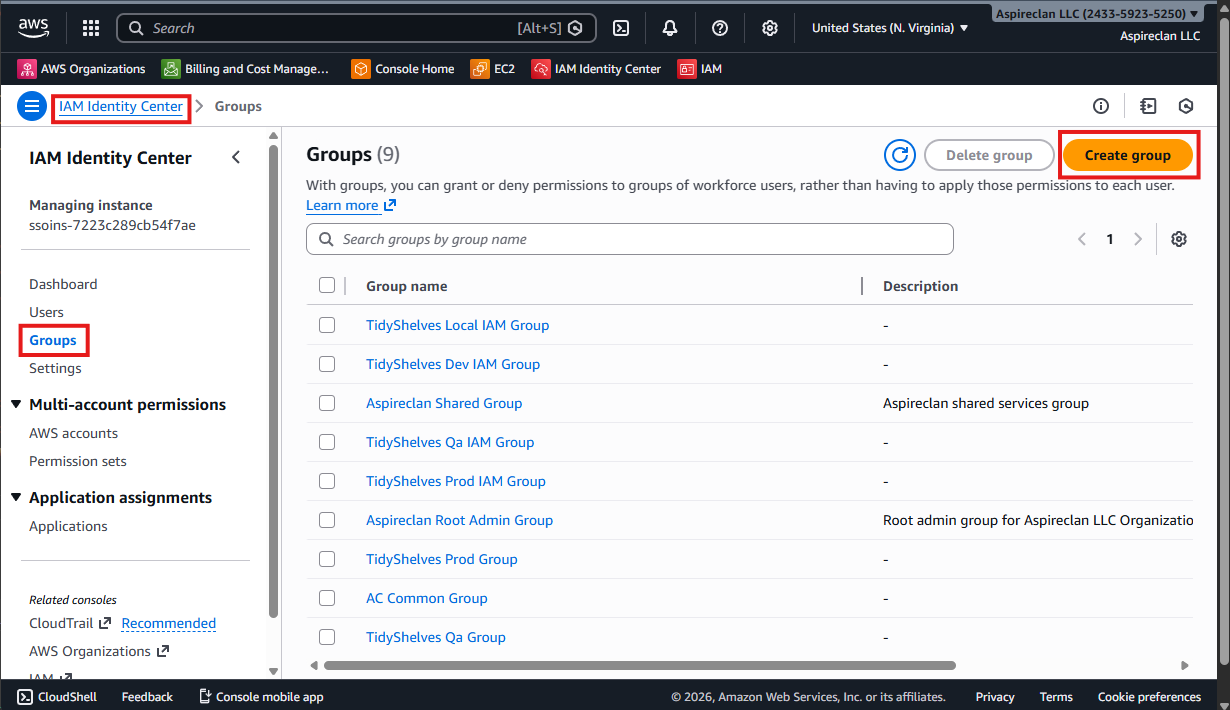
7.1 Start group creation
Create a new user group in AWS IAM Identity Center.
- Go to IAM Identity Center
- Select Groups
- Click Create group
8. Group Details
8.1 Provide the group name
Provide a clear and standardized name for the user group.
- Group Name:
se dev iam group - Click Create group
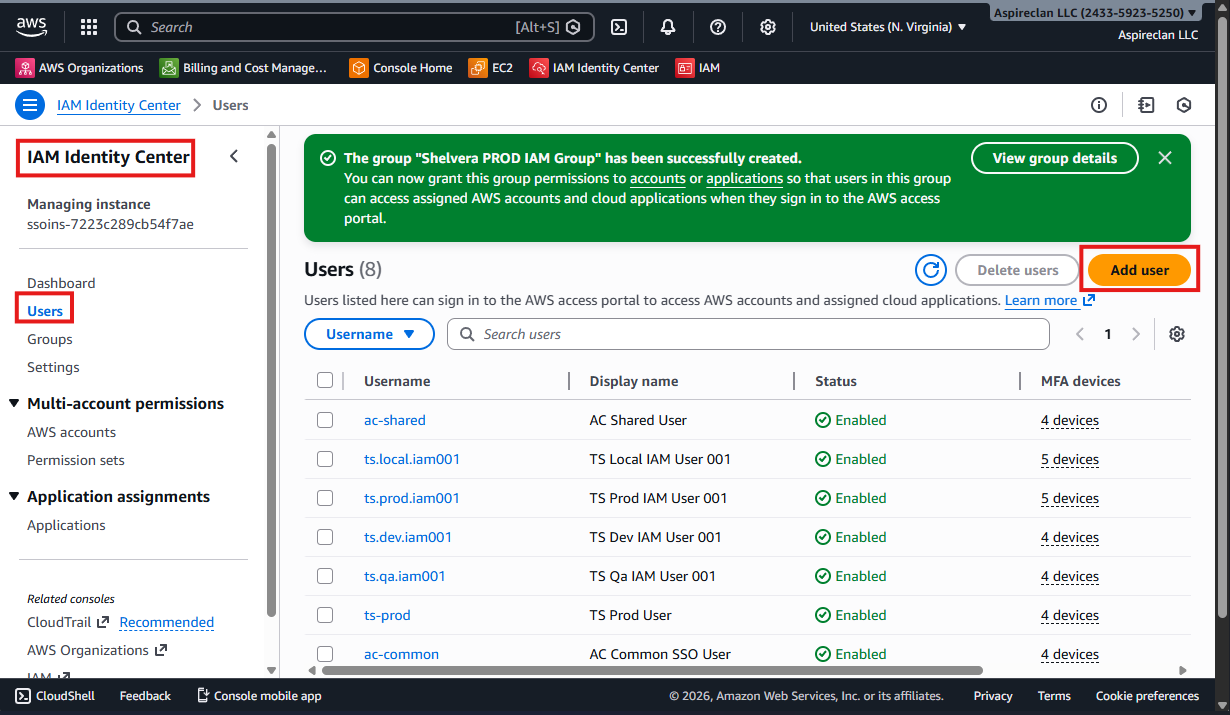
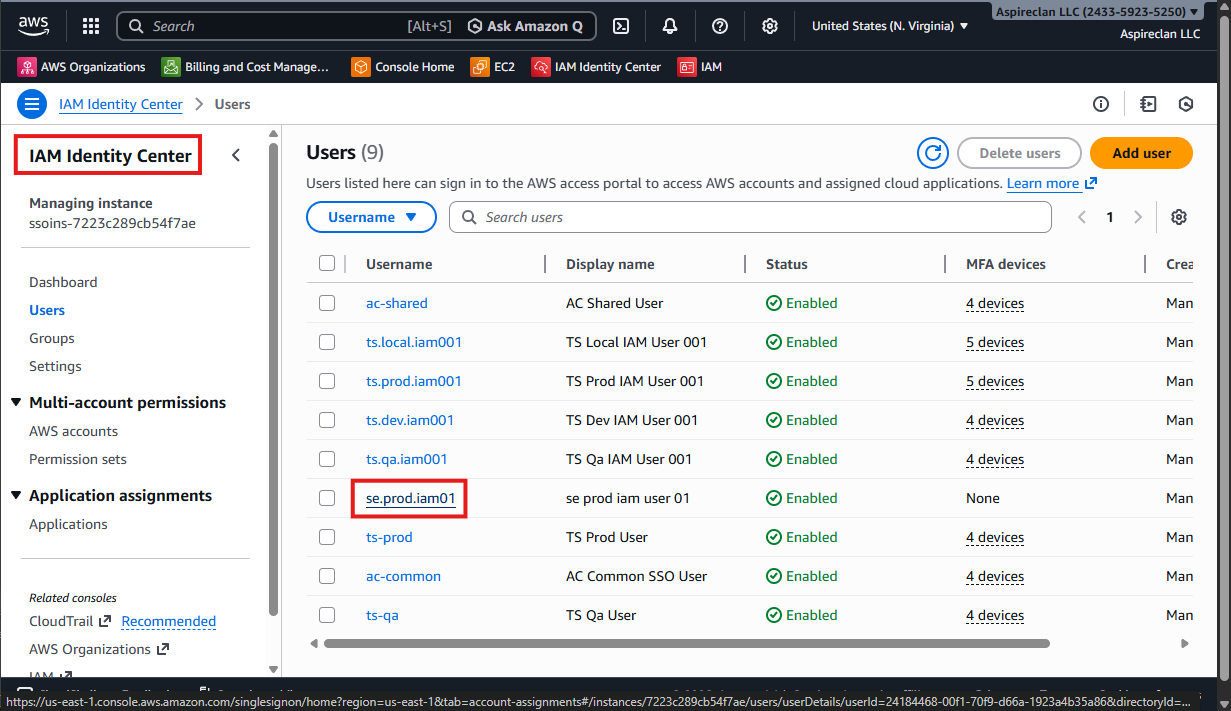
9. Create IAM User
9.1 Open Users and add a new user
Create a new IAM user in AWS IAM Identity Center.
- Go to IAM Identity Center
- Select Users
- Click Add user
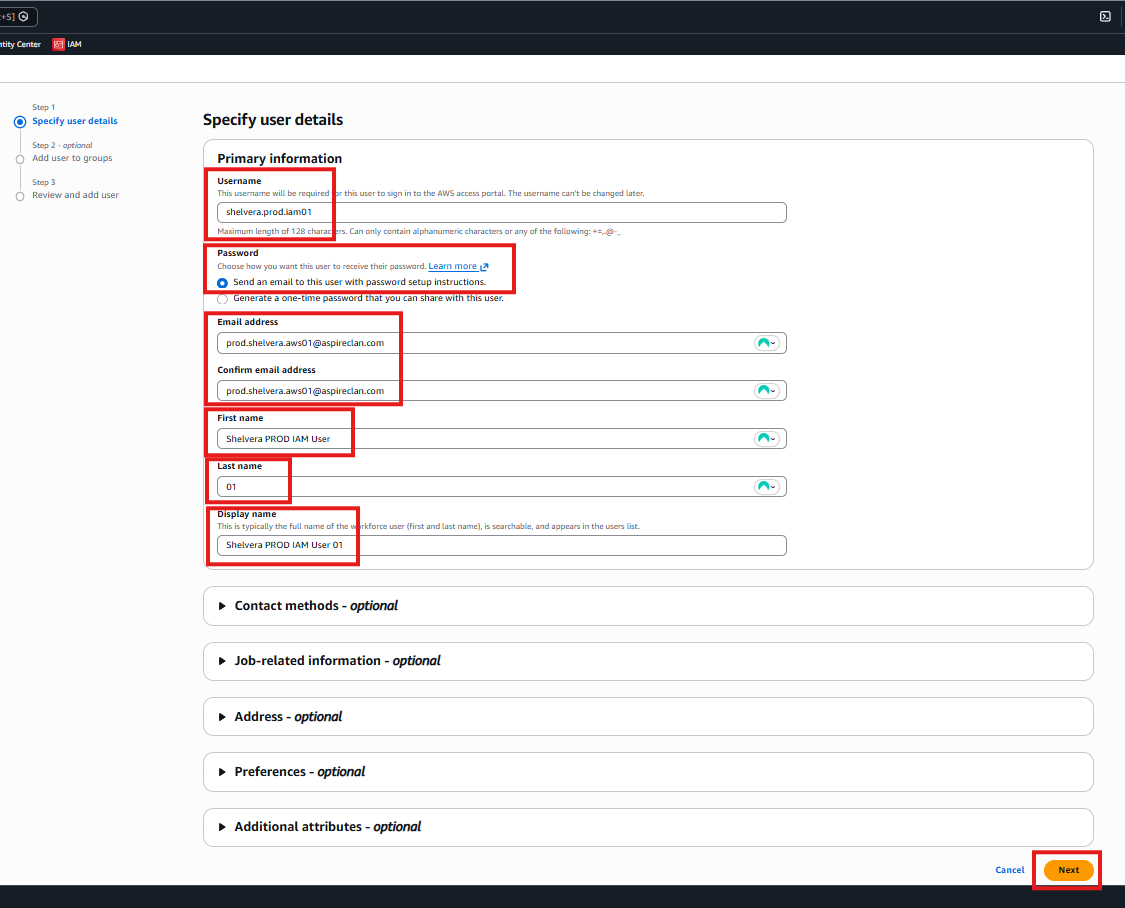
10. User Details
10.1 Fill in the user fields
Provide the IAM user details using the standardized naming pattern.
- User name:
se.dev.iam01 - Email:
dev.se.aws01@aspireclan.com - First Name:
se dev iam user - Last Name:
01 - Display name:
<Leave blank> - Click Next
11. Add User to Groups
11.1 Select the target group
Add the newly created user to the appropriate IAM group.
- Select the group name:
- Click Next
se dev iam group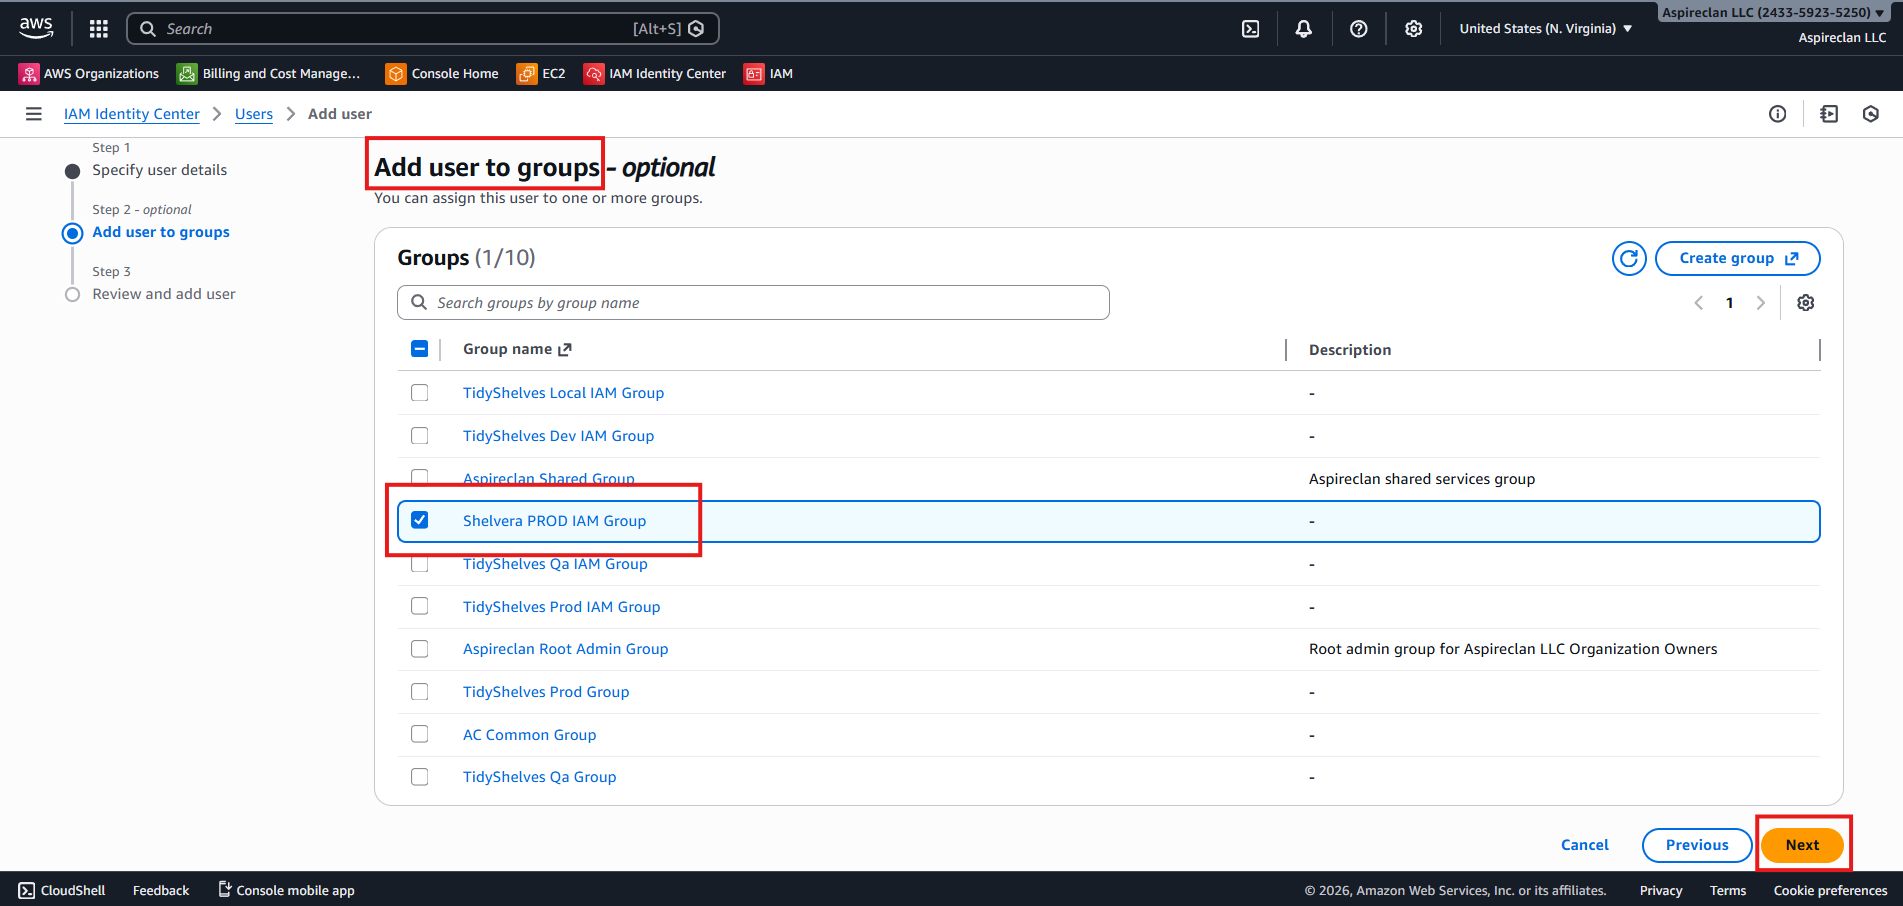
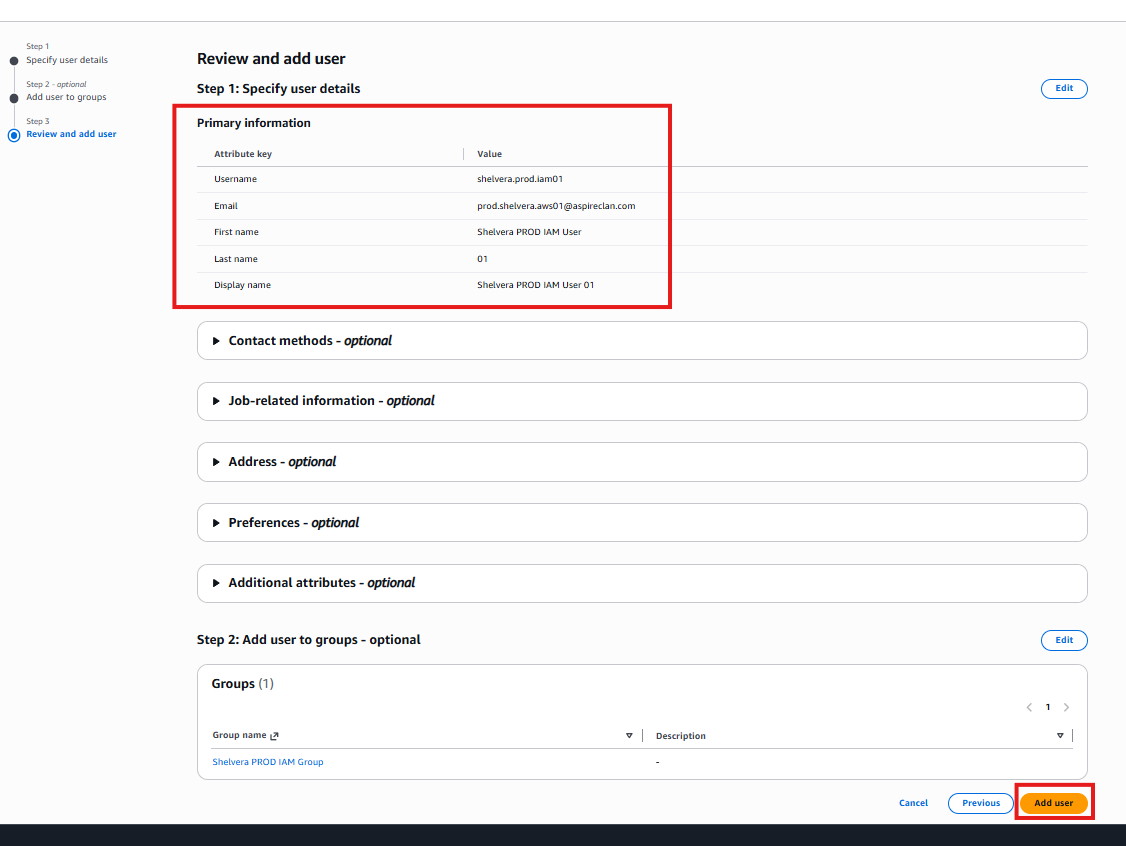
12. Review and Add User
12.1 Review the user information
Review the IAM user details and group assignment.
12.2 Add the user
- Review the user information
- Confirm the group assignment
- Click Add user
13. Accept AWS IAM Identity Center Invitation and Assign AWS Account Access
13.1 Accept the invitation email
After you add the user, AWS IAM Identity Center sends an invitation email.
- An email will be sent to:
dev.se.aws01@aspireclan.com - Open the email and click Accept invitation
- Set a password and complete sign-in
13.2 Save the login + passkey details
NordPass (recommended): save the IAM Identity Center login and passkey details.
- NordPass login name:
se dev aws iam 01 - NordPass Passkey Name:
passkey - se dev aws iam 01 - Passkey name in AWS Account:
nordpass-passkey
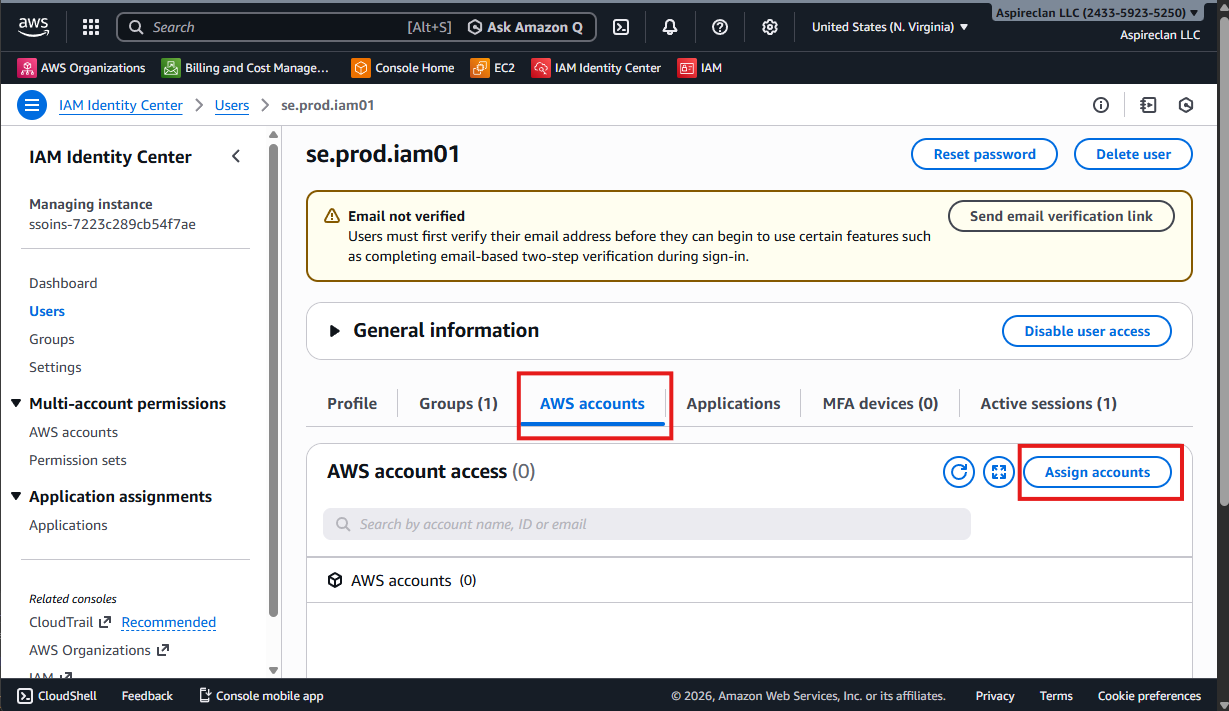
13.3 Assign AWS account + permission set
Assign AWS Account + Permission Set
- Go to IAM Identity Center → Users
- Click the user you created:
se.dev.iam01
- Open the AWS accounts tab
- Click Assign accounts
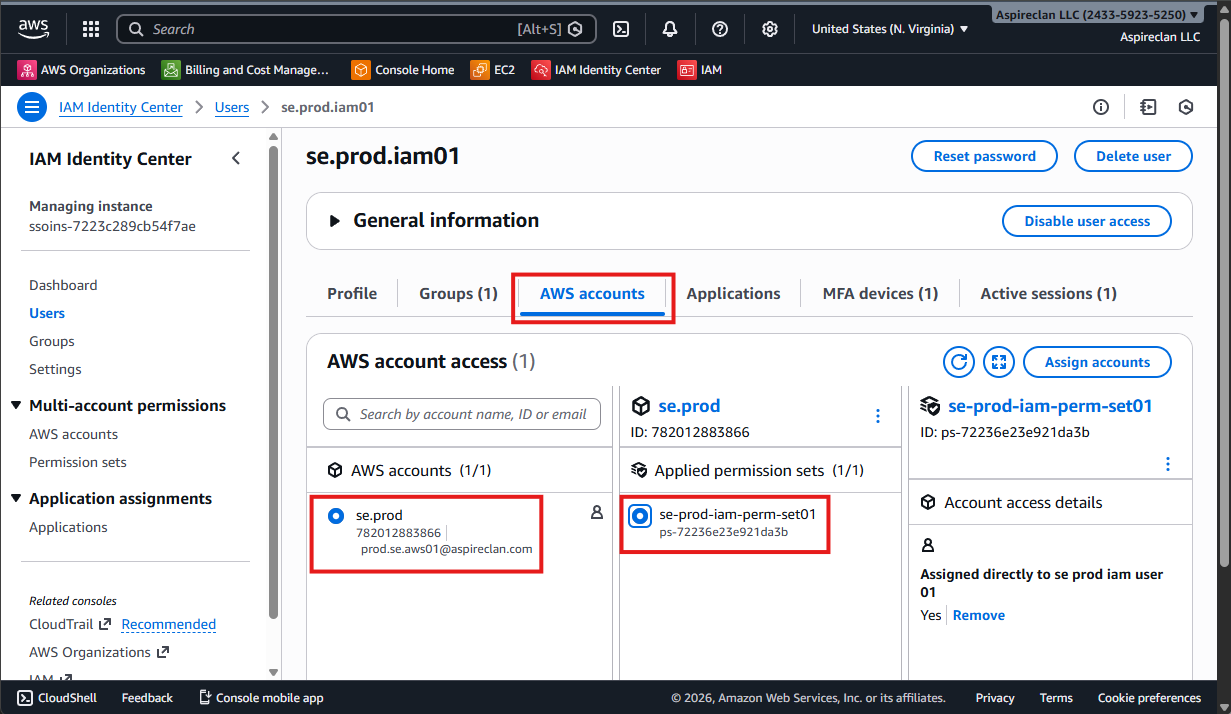
13.4 Select account and permission set, then assign
- Select AWS account:
se.dev - Select permission set:
se-dev-iam-perm-set01 - Click Assign

14. Logout, Sign In as the New IAM User, and Register a Keeper Passkey Device
14.1 Logout and open AWS Access Portal
Log out of the AWS Root/Admin session, then sign in via the AWS Access Portal as the new IAM Identity Center user.
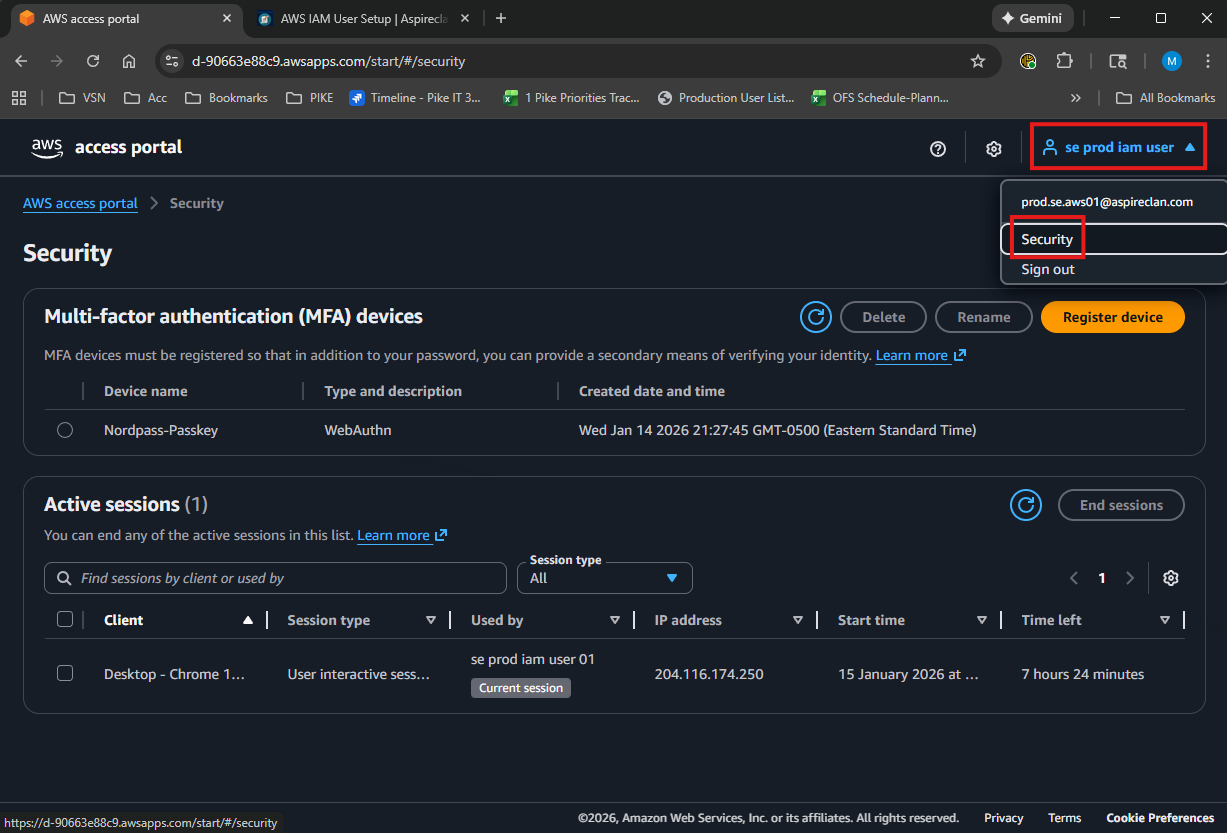
14.2 Sign in as the new IAM Identity Center user
- Sign in using the new IAM user:
se.dev.iam01 - Click the top-right user menu (it should show the user label):
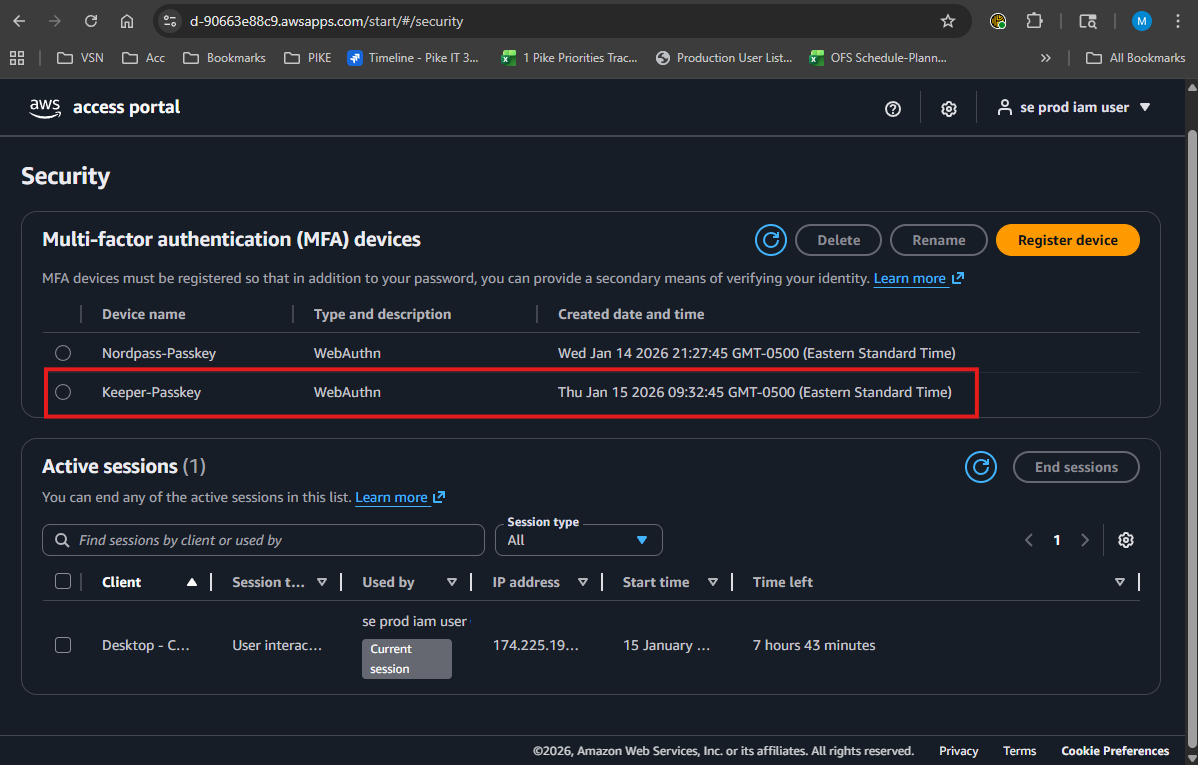
se dev iam user 01 - Click Security.
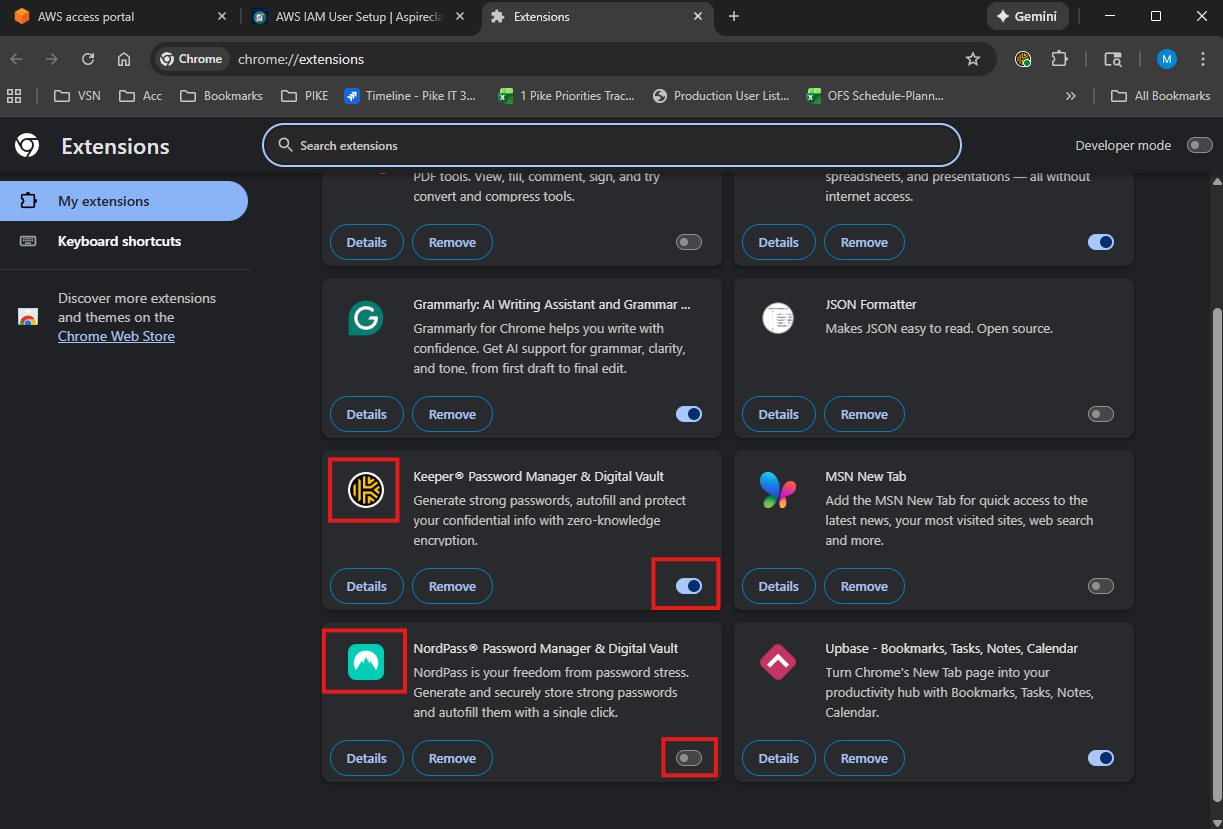
14.3 Prepare Chrome extensions for passkey provider
Prepare Chrome extensions so the passkey is created and stored in Keeper (not NordPass).
- Open Chrome → Extensions → Manage extensions.
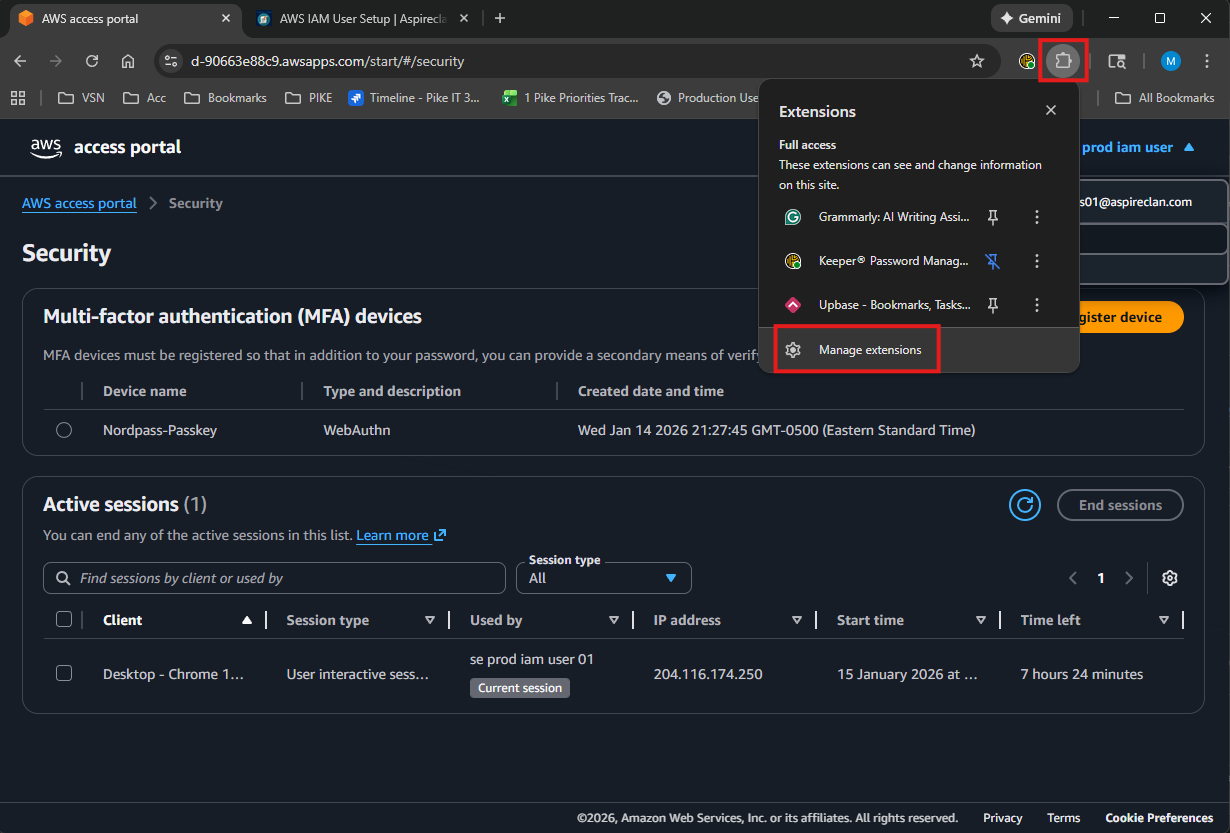
- Switch OFF NordPass and switch ON Keeper.
- Close the extensions tab.
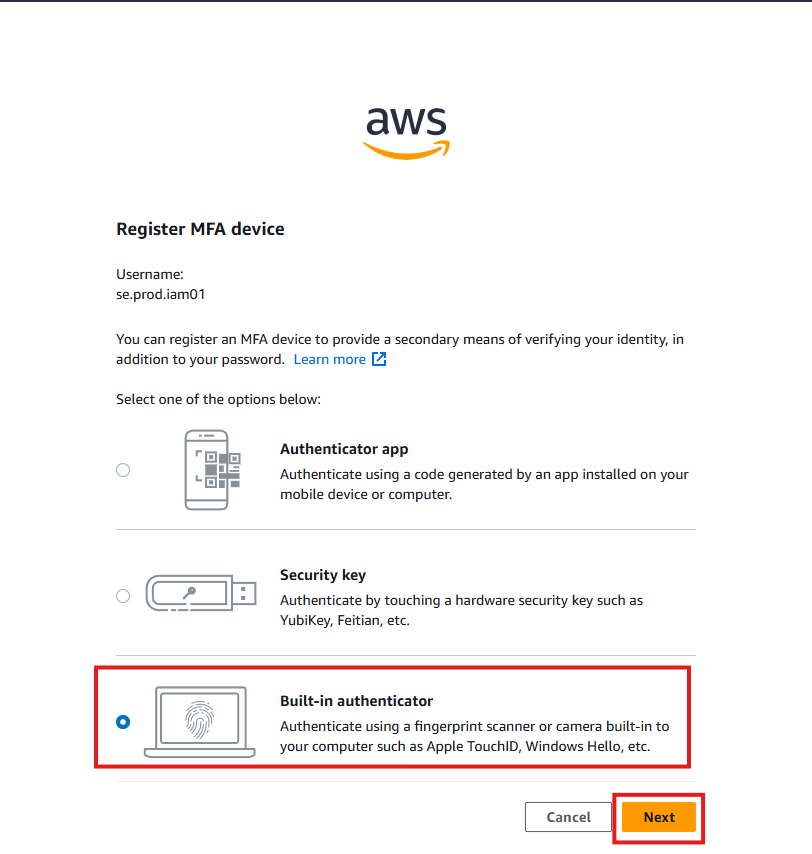
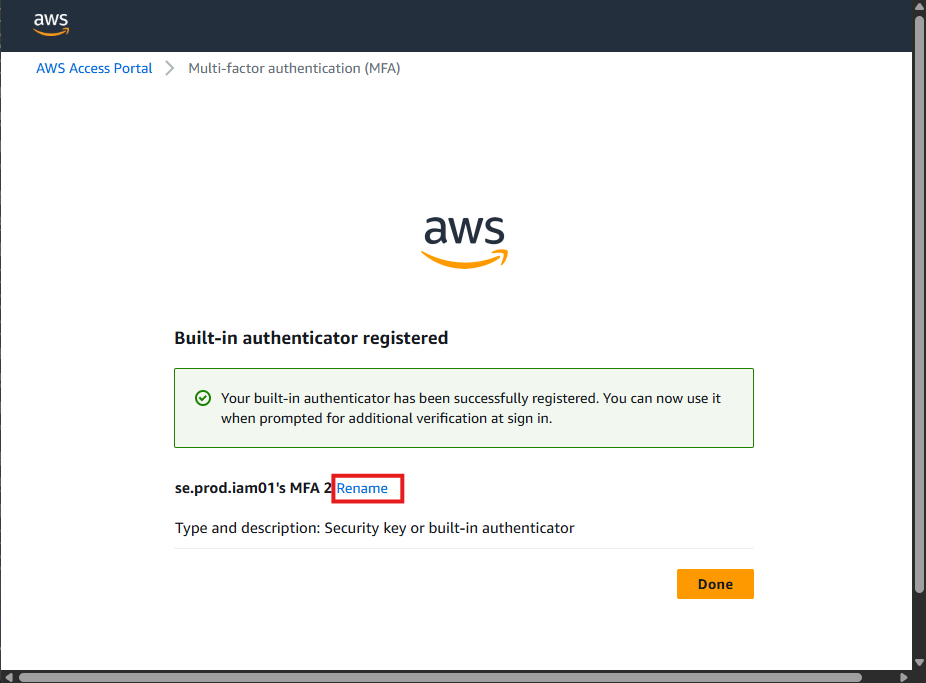
14.4 Register device (passkey) in AWS Access Portal
Register device (passkey)
- Go back to the AWS Access Portal.
- Click Register device.
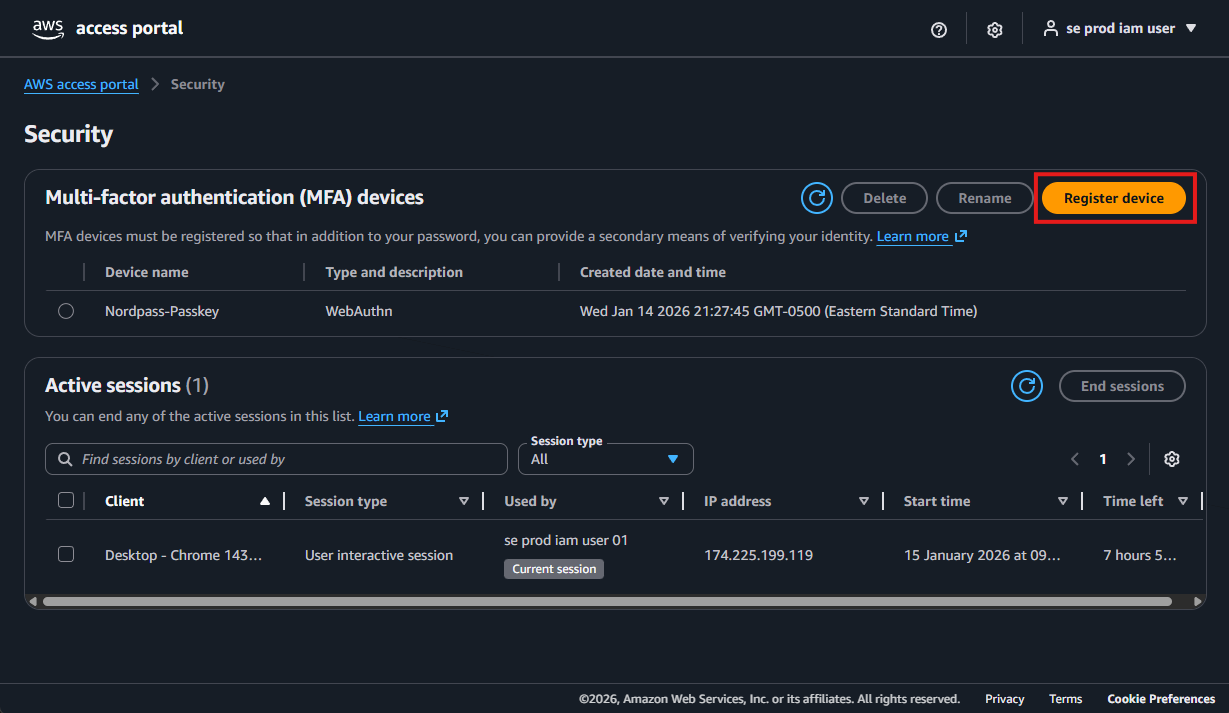
- Select Built-in authenticator.
- Click Next.
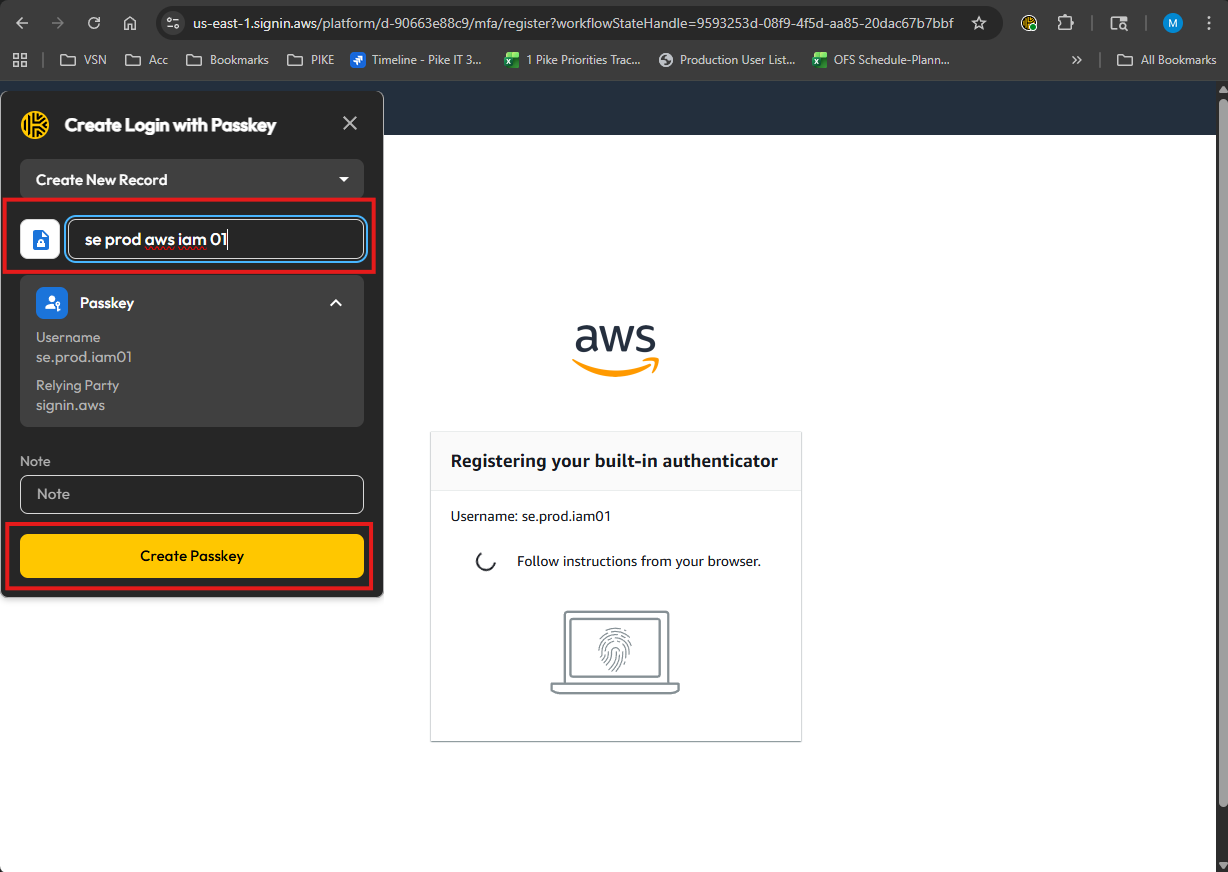
14.5 Set passkey names (Keeper + AWS)
- When Keeper prompts for the passkey name, use:
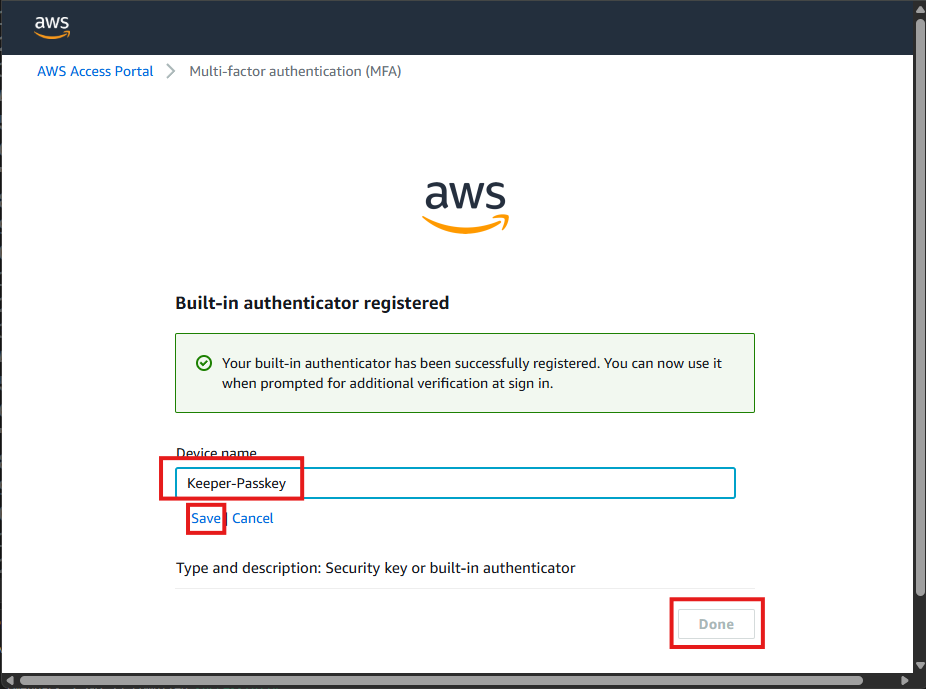
passkey - se dev aws iam 01 - In the AWS account, set the passkey name as:
keeper-passkey
15. Restore Chrome Password Manager Extensions
15.1 Restore your default extension settings
- Open Chrome → Extensions → Manage extensions.
Switch OFF Keeper and switch ON NordPass.
- Close the extensions tab.
16. Enable Root Password Recovery for the Account
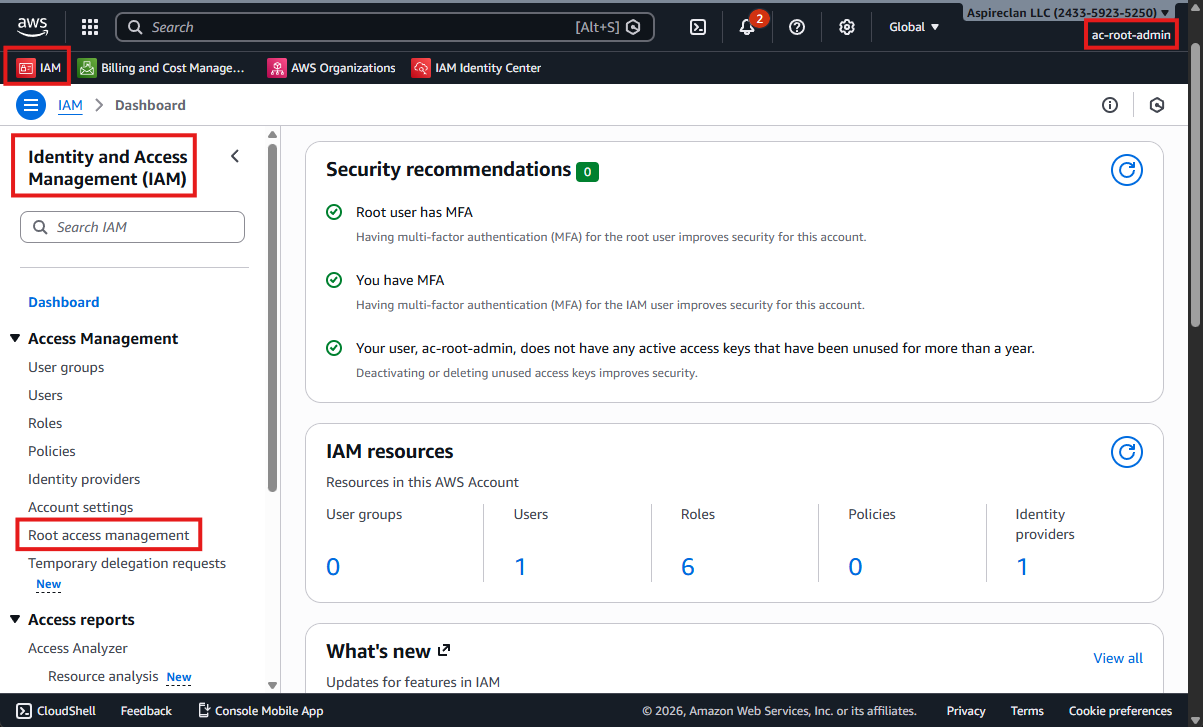
16.1 Login as AWS Org Root IAM User (ac-root-admin)
Log in as the AWS Org Root IAM User (ac-root-admin) and enable password recovery for the target AWS account.
16.2 Open Root access management
- Log in as AWS Org Root IAM User (ac-root-admin).
- Go to IAM.
- Select Root access management.
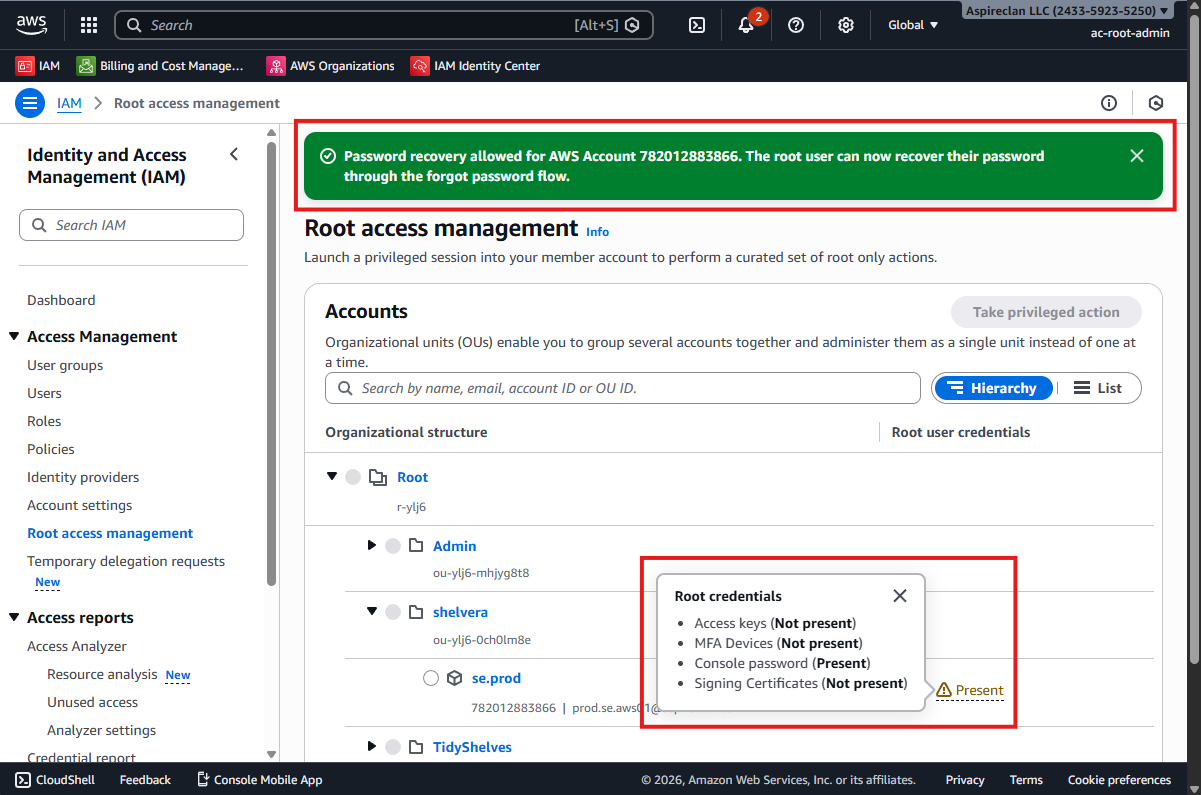
16.3 Take privileged action and allow password recovery
- Select the account ts.dev.
- Click Take privileged action.
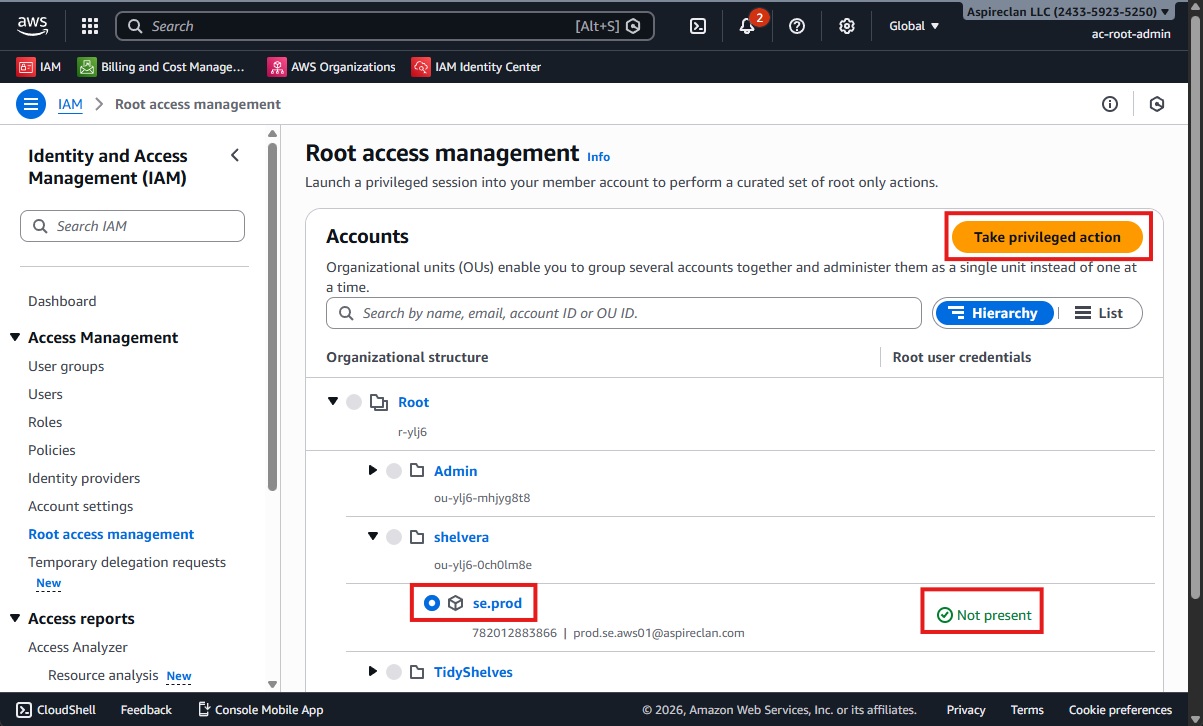
- Select Allow password recovery.
- Click Allow password recovery to confirm.

17. Reset Root User Password and Configure MFA
17.1 Reset root password
Sign out and complete the Root User password reset for the account.
- Sign in using root user email:
dev.se.aws01@aspireclan.com - Click Forgot password.
- An email will be sent to:
dev.se.aws01@aspireclan.com - Set a new password (store securely).
- Sign in as Root User using:
dev.se.aws01@aspireclan.com
17.2 Configure MFA using NordPass passkey
- NordPass login name:
se dev root user 01 - Enter the verification code sent to:
dev.se.aws01@aspireclan.com - MFA device name:
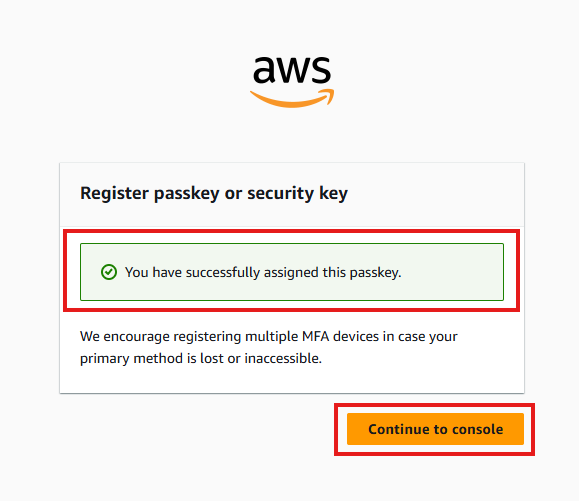
nordpass-passkey - Select Passkey or Security key → Click Next
- NordPass Passkey Name:
passkey - se dev root user 01

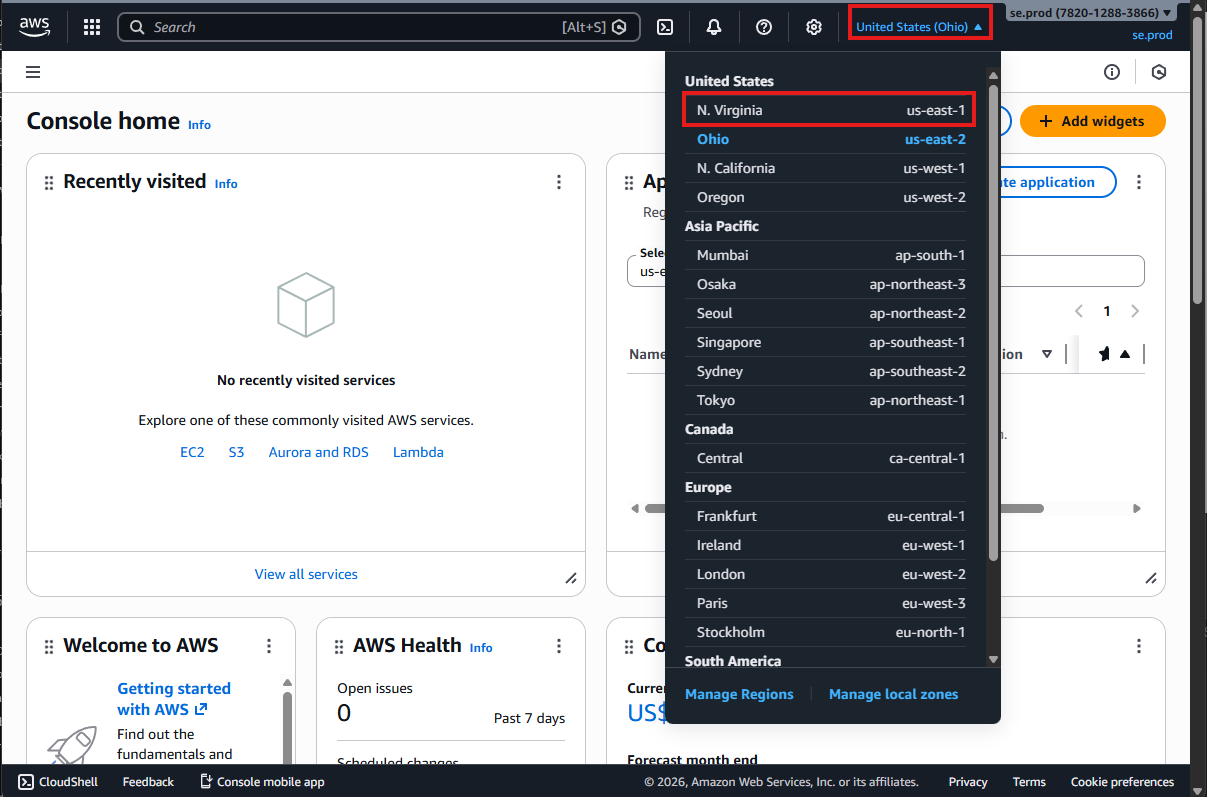
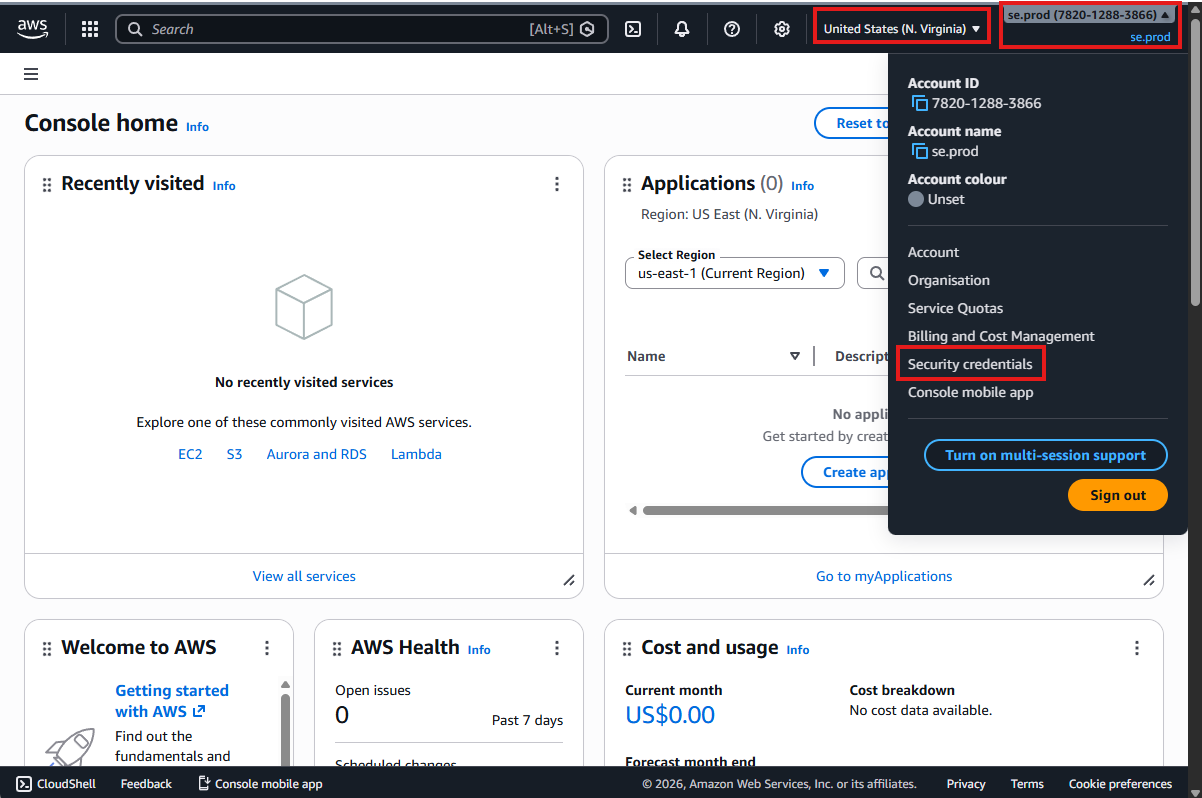
17.3 Switch region and open security credentials
- Continue to console.
- Select the region N. Virginia (if not selected already).
- Click top-right account menu:
se.dev - Click Security credentials.
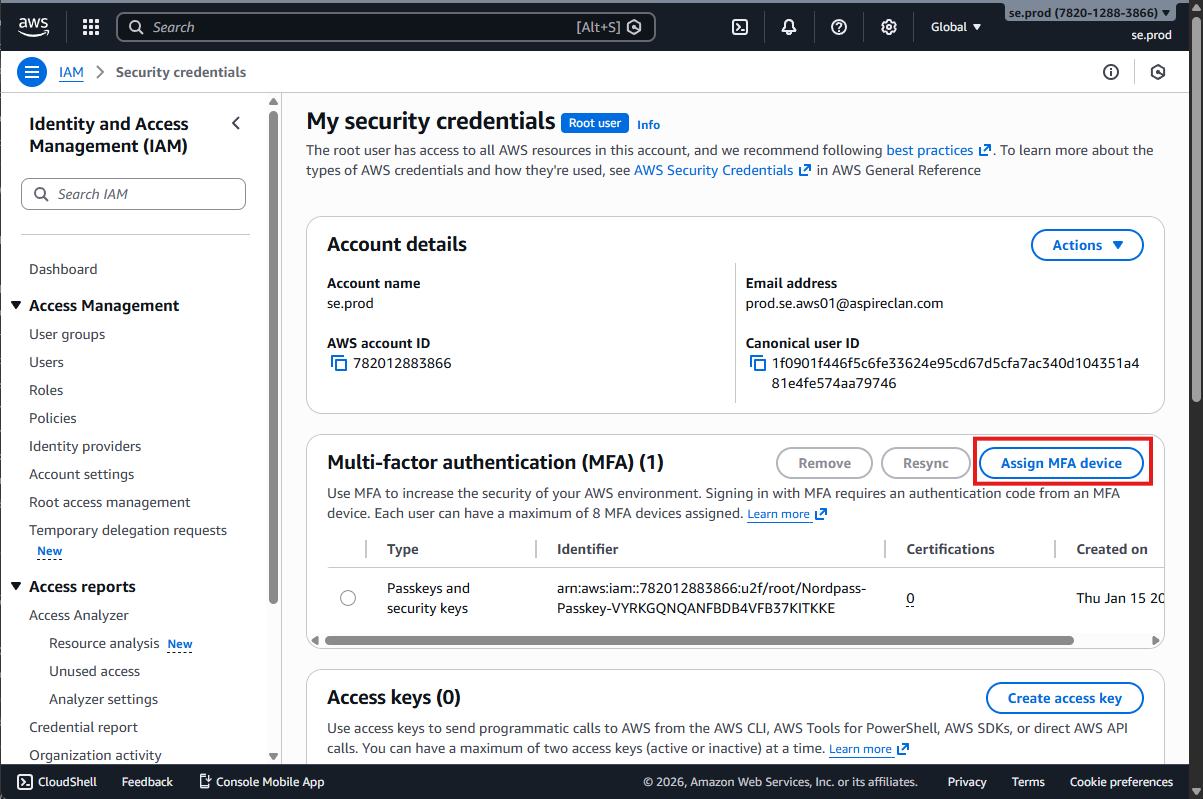
17.4 Switch MFA provider to Keeper and assign passkey
Switch MFA Provider
- Manage Chrome browser extensions.
- Switch off NordPass, switch on Keeper.
- Close the extensions tab.
- Click Assign MFA device.
- MFA device name:
keeper-passkey - Select Passkey or Security key → Click Next
- Keeper Passkey Name:
passkey - se dev root user 01
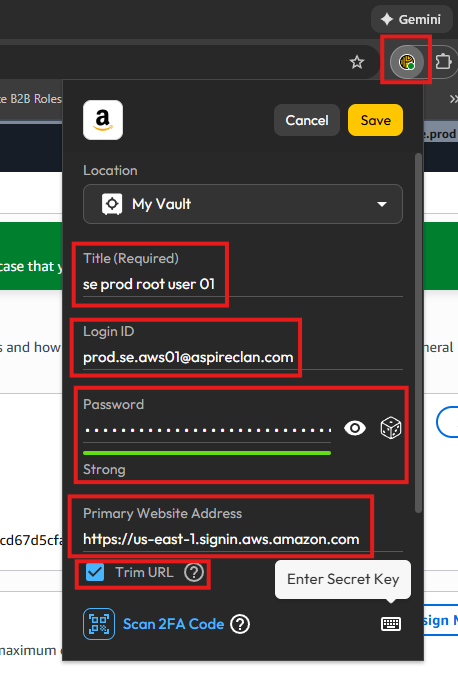
17.5 Store credentials in Keeper
Store Credentials in Keeper
- Open the Keeper Windows app.
- Create a new record → Login.
- Title:
se dev root user 01 - Website Address:
https://us-east-1.signin.aws.amazon.com - Login ID:
dev.se.aws01@aspireclan.com - Save the password securely.
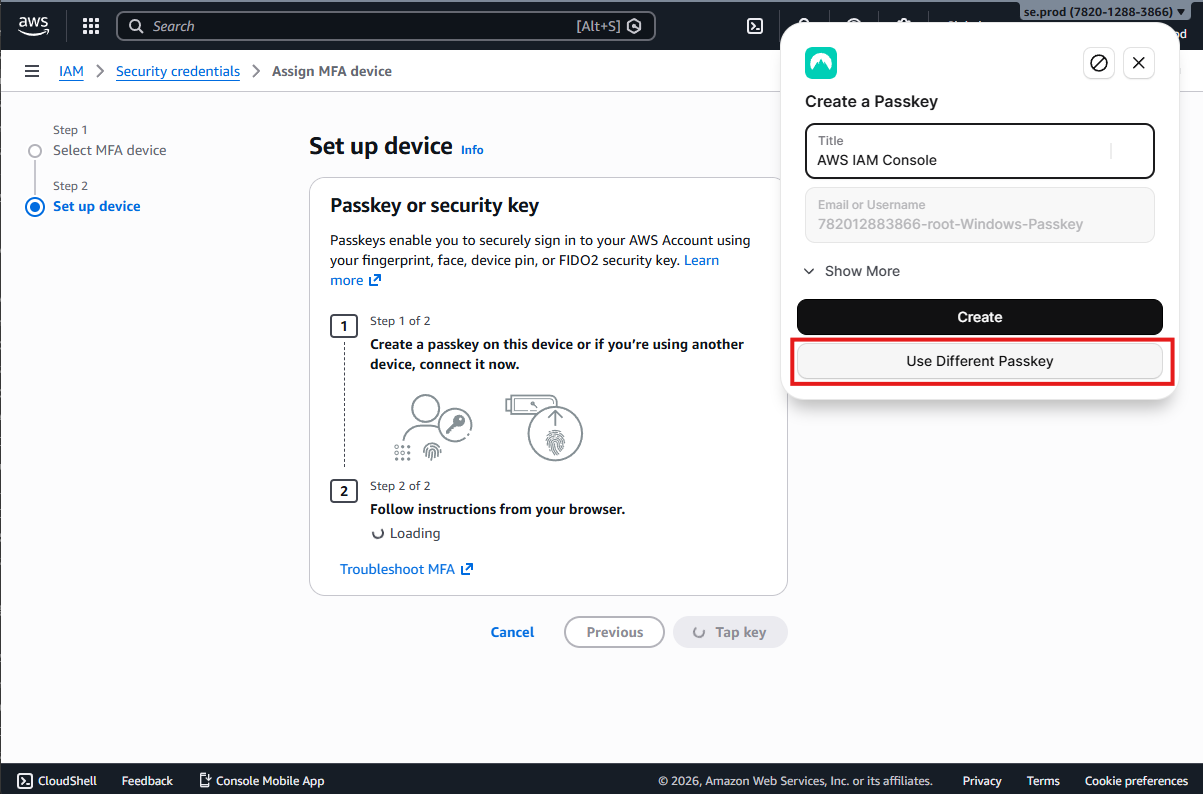
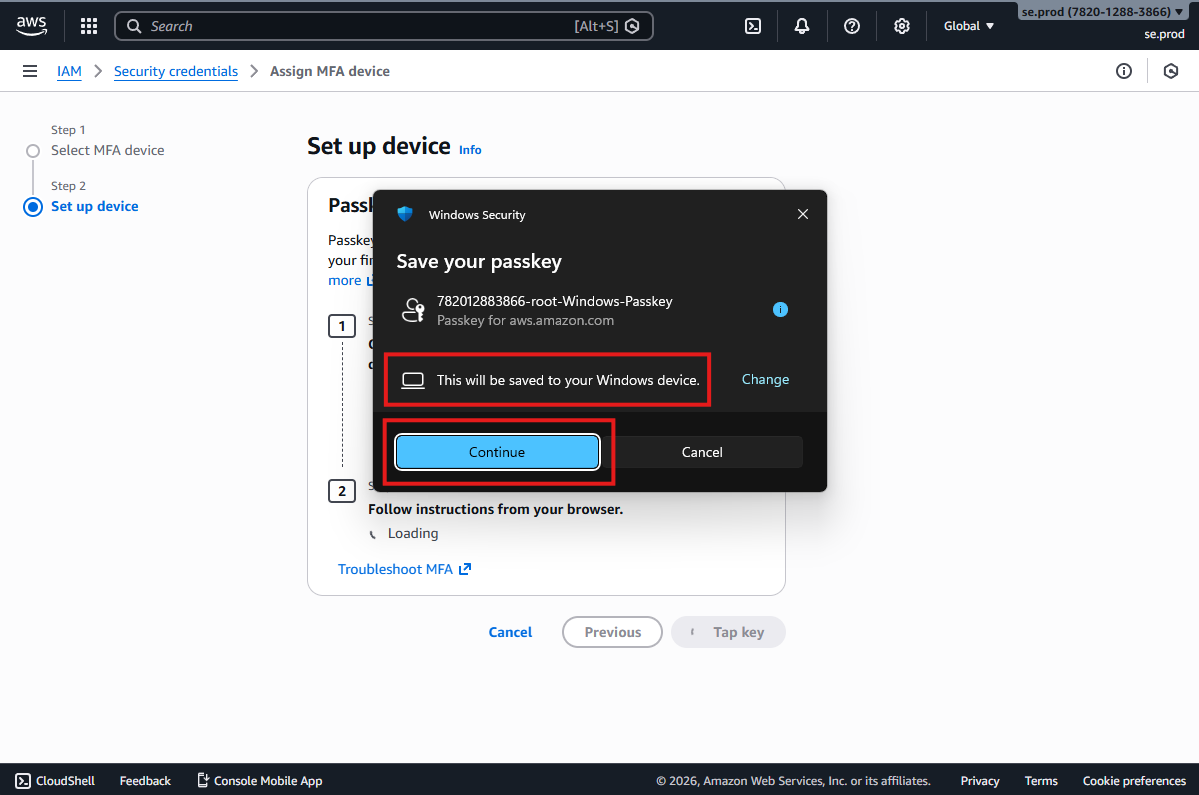
17.6 Finalize MFA with Windows passkey (and restore extensions)
Finalize MFA with Windows Passkey
- Manage Chrome browser extensions.
- Switch off Keeper, switch on NordPass.
- Close the extensions tab.
- Click Assign MFA device.
- Select Passkey or Security key.
- Authenticator name in AWS Account: Windows-Passkey
- Select a different passkey if NordPass appears again.